
When I saw this research point coming up I already had ideas and when I finally got here everything started to fall into place. The human anatomy is such a massive subject and I knew that I wouldn’t be doing a full anatomical drawing as I didn’t want to get stuck in a hole researching for days, so I decided to focus on my favourite part of the human anatomy, the back.
While searching for ‘Anatomy Drawing’ on Google I came across a link on Artist’s Daily,
Anatomy Drawing for Artists: An Art Lesson on Studying & Drawing Anatomy . The free e-book, written by Dan Gheno has got some nice images in and it doesn’t give you any shortcuts but I did get some ideas from it.
Firstly, like anatomy drawings by Michelangelo and Leonardo da Vinci, a lot of the works by artists in the free e-book are on coloured paper and so I decided that this drawing would be a drawing in Conté Crayon on coloured pastel paper similar to the paper that I had used in Assignment 2 – Observations in Nature. I had used Conté pencils before but not the sticks that I had bought from Silpakorn University, over a year ago now, before I started this course.
I had to start somewhere and so the same night that I downloaded the free e-book I took my camera to my girlfriend’s apartment and after a short debate I decided that it would be my back that I would be drawing and so we did a session in the gym, followed by a dip in the pool to ‘get a pump on’ so that I could get some muscle definition showing in the photographs.
I had quite a few photographs taken in the gym and in the shower at different angles…from the left-hand side, from the right-hand side, arms stretched out at the side, arms at the front, arched back etc. Eventually I found the right photograph for the drawing, a photograph that would help me see where the main muscles and bones were.

After choosing a good photograph for this research point I made a quick pencil sketch in my A4 sketchbook and then did a search for some anatomical drawings of muscles and bones. After discovering 2 great books ‘Grant’s Atlas of Anatomy‘ and ‘Bridgman’s Complete Guide To Drawing From Life‘ downloading them both in PDF format and having a quick browse through, I went back on line and looked for Anatomical Drawings of back muscles.

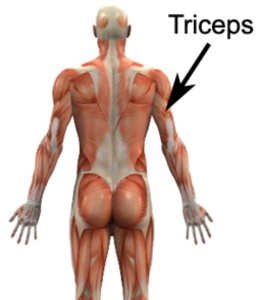
I found a good image in a similar pose to mine depicting the major back Muscles – www.physioadvisor.com.au and then remembered a quote that I read in the free e-book by by Dan Gheno earlier ‘ A helpful exercise is to first draw the figure in simple, flat silhouette form. Then, try to superimpose your understanding of the bones within’. However, instead of trying to superimpose my understanding of the bones within I decided that I would try and superimpose my understanding of the major back muscles.
On a thick tracing paper I used black and sanguine Conte pencils as well as my Derwent Chinese white pencil to quickly sketch in the major muscles over the preliminary drawing below. The end drawing wasn’t perfect but it was a start. From here I enlarged my drawing onto the coloured pastel paper.

The drawing on tracing paper looked more like a space suit from the ‘Riddick’ movies than anything else so before I committed myself to the final drawing, which actually at this point, I didn’t know would be an ‘in the flesh’ or muscle drawing, I had to do a bit more research.
Fortunately for me the back seems to be the anatomy artist’s favourite subject, as the back plays a significant part in human society and is the largest part of the human body and so finding good anatomical drawings of the back muscles in full display is not difficult, particularly the first layer of posterior torso muscles which is all I really wanted at this stage.
I found a great website www.medical-artist.com that had some great illustrations on so between the site and Grant’s Atlas of Anatomy I was able to check whether or not my earlier drawing and superimposed muscle drawing were correct.
It was time to start on the bigger drawing so I enlarged the smaller drawing onto an A2 sheet by drawing a grid and then drew my outline. I started on the left hand side with white and brown conte sticks, drawing the creases of the flesh by taking the colour off with a putty rubber to depict muscle tone.

As I crossed over onto the left hand side it was easier to see how I would be able to work in the muscle lines in order to make it look like a dissection drawing. This time the muscle drawing was more anatomically correct but it took more colours than what I expected, working with brown and white Conte sticks plus Sanguine and Black Conte pencils.
When I finished the drawing, I thought maybe I should label the muscles by numbering the muscles and then writing the name of the muscles in a key, top left to show some understanding of the muscles drawn. However, so as not to ruin it, I decided to keep it as it is.
