Tutor Feedback – Assignment 4

3 - Lying Down - Conte Stick and Compressed Charcoal

Overall Comments

You’ve delivered another strong submission Mark. The determination and enthusiasm you have shown throughout the past four parts of the module has clearly been of great benefit to you as you approach the final part of this module. It is your unerring interest in the subject of drawing and your resolve to advance in the process that will successfully see you through to the end of this course. 

The first exercises looking at quick and long poses display good observational skills. Quick sketches of the figure are a wonderful way of loosening up before approaching longer, more studied pieces and allow the artist to look at the subject in a rapid way, to define what is integral as well as superfluous in the detail of the sketch in the given time and is important for honing the eye and hand. They are well-proportioned and show that you can handle – and understand – the process of measuring well. As these are your first experiments with drawing the figure from life I think you should feel very happy with the results. The more you do the more adept you will become with the process of looking and transposing what you see. Again the longer poses display good proportional observation as well as a good understanding of the portrayal of attitude.

I learnt a lot about measuring proportions from this exercise particularly how many heads distance it was from the crown of the head to the seat of the bum which was approximately 3.5.

The drawings you have produced for the essential shapes and elements exercises show good understanding of how to represent form and your decision to use charcoal was well founded both in the drawings of your girlfriend and in the series of your daughter. Proportion is well observed and rendered and elements such as foreshortening have been approached simply and successfully. You mentioned in the check and log for the proportion exercises that you feel a little frustrated with your abilities to represent a facial likeness in relation to the overall drawing – one step at a time Mark. With your focus and determination I am in no doubt that you will find that you’ll develop your own way to tackle the complexities of facial structure. Like the body it is all about proportion and form but with the face the detail is much more intricate. The ‘tightness’ you perceive when approaching the face is normal for this early stage of your practice. It is the pressure we put on ourselves to achieve a ‘true’ or life-like representation of the model’s features that often hinders progress and ‘puts us off’, especially when you are not only restricted by time but the desire to ‘get it right’ creates a kind of hurdle to what is normally free-flowing creative expression. For these exercises it is not necessary to produce fully formed portraits with intricate detail. Try to hint at the features by using simple tone to describe the shape of the face.

4 - Charcoal on A3 Paper
Charcoal on A3 Paper
1 - Charcoal on A4 Sketch Book
Charcoal on A4 Sketch Book

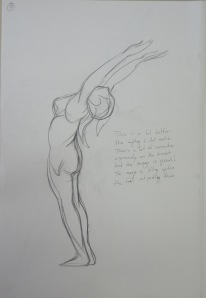
You have produced a vast array of work for the stance and energy exercises. It is good to see that you are pushing yourself with such enthusiasm Mark and the results show that you have a good eye for the depiction of weight and balance. The line you use in these sketches is particularly appropriate and successful: it is sure and confident and delineates the stance and energy of the poses without forsaking attention to detail such as proportion and anatomy.

I wasn’t as impressed with my energy drawings and so after I submitted my coursework I did some research on Gesture drawing as well as some reading, Force, Michael Mattesi and did a new set of drawings for this exercise, which I did submit to my tutor afterwards so maybe that is what he is taking about. 

drawing 4
New Run at Gesture Drawings

You have approached the structure exercises with great enthusiasm and openness with regards the use of different techniques and media. There are some very slight issues with proportion in some but I don’t think you should be overly concerned here – it’s like you’ve concentrated too closely on specific detail rather than considering how each anatomical element relates and works together by looking at the subject as a whole.

4 - Finished Anatomical Drawing Half and Half
Finished Anatomical Drawing Half and Half

I think my tutor was talking about the anatomical drawing above but I am not too sure. If so then I can say I wasn’t thinking about specific detail, I was thinking about how anatomical elements related to each other. At this stage we were a bit ‘shy’about nude drawings in detail but the choice of clothes for the model, my girlfriend, on this exercise was probably a bit poor and so it didn’t show off the structure as well and so I wasn’t able to.

1 - Sitting, Conte, Charcoal, Conte Pencil
1 – Sitting, Conte, Charcoal, Conte Pencil
2nd Pose 3 - Water Soluble Pencils Better Proportions
2nd Pose 3 – Water Soluble Pencils Better Proportions

In the conté and charcoal drawing of the seated figure, the upper part of her right arm appears too thin in relation to the overall proportion, and in the drawing using white gel ball the arm resting on the door knob appears a little elongated. The foreshortened reclining pose in conté and charcoal however is very nicely observed and delineated in terms of proportion, form and structure. The depiction of foreshortening can often cause great problems and confusion but not in your case. You’ve produced a very well executed drawing here Mark.
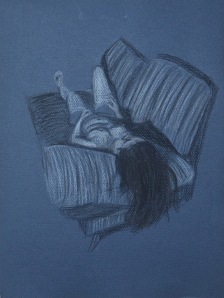
3 - Lying Down - Conte Stick and Compressed Charcoal
Lying Down – Conte Stick and Compressed Charcoal

I am hitting the same problems all the time, I am producing my best work on a small scale, I love this drawing and yet I am not sure whether it will get me where I want to be in the assessment when framed.

The drapery studies for the clothed figure exercises also show keen observational abilities. The manner in which you have portrayed the lightness and swathe of the fabric by utilising line following form and allowing the surface of the paper to describe highlights is very successful. The subtlety of tonal range in these drawings is also very well observed and this is particularly successful in the two drawings of the reclining figure using white pastel on black paper and the graphite version of the same pose (I must also say here that the face in this piece is beautifully rendered!). There is an undeniable believability in the way you have portrayed how the fabric drapes over the model’s body.

2 - White Pastel on Black paper
2 – White Pastel on Black paper
1 - 6B Pencil in A4 Sketchbook
1 – 6B Pencil in A4 Sketchbook

I shall be producing a finished piece for the exercise above from these sketches and the drapery studies.

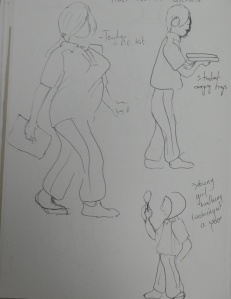
You quick sketches for the sitting and waiting and fleeting moment exercises show good observational responses to what can be quite a difficult and pressurised way to work, especially for you in terms of the recent circumstances in Bangkok!

4 - Walking Women in Oil Pastel
Walking Women in Oil Pastel

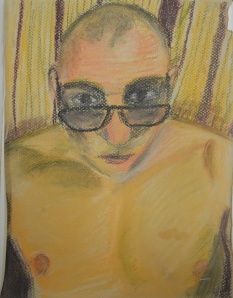
It is evident that you thrive on these set tasks Mark. The definite evidence of development as you work through the self-portrait exercises is clear. The determined and studied visual research for shape and proportion you have employed for this exercise has surely helped with this. From the slightly tentative first sketches for the ‘Drawing your face’ exercise to the surer, more ‘finished’ pieces in different media, you have once again produced a focused collection of work. I thought the eighth portrait in conté and Chinese white pencil particularly successful with good attention to incident and reflected light. I thought the portrait from memory of Vladimir Putin worked well and was definitely recognisable as the Russian leader. 

Feedback on assignment Demonstration of technical and Visual Skills, Quality of Outcome, Demonstration of Creativity 

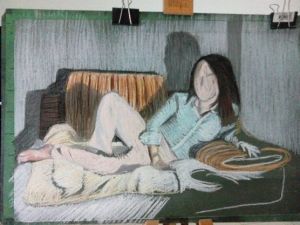
The assignment piece of your girlfriend reclining on the sofa in soft pastel was very well conceived, observed and executed. Once again you have handled the media successfully. The composition is well-balanced and the depiction and overall effect of light and shade makes for a very effective study – a nod to the reclining figure from the history of art, to Manet’s Olympia, Titian’s Venus of Urbino, Velázquez’s Rokeby Venus, Goya’s La maja desnuda, the list goes on? A very successful piece Mark!

Tone and Form - Finished Piece Soft Pastel, Green Ingres
Tone and Form – Finished Piece Soft Pastel, Green Ingres

This assignment was a breath of fresh air after the last one but there was a downside though that I hadn’t expected. The soft pastel colours were so bright until I used the fixative what I hadn’t anticipated was that the fixative would dampen it or blow the pastel dust away and allow so much of the green paper to show through making it murky, the upside of this of course is that it gives it a ancient/spooky look.

Tone and Form - Finished Piece Soft Pastel, Green Ingres
Final Drawing

Learning Logs or Blogs / Critical essays Context

As with your previous submissions you have delivered an honest, informative and thorough learning log for this part of the module. I enjoyed reading the piece on artists’ self-portraits and thought the manner in which it was written was fresh and personal – a welcome divergence from the usual heavily fact-based information we as tutors sometimes have to read! I am also very pleased to read that you are getting a lot out of Berger’s Ways of Seeing.

Sketchbooks 

What I find encouraging about the way you work Mark is that you are rarely put off by new processes; in fact you appear to thrive on the challenge. You confront new disciplines fearlessly and with an open mind to technique and media. The evidence is here in your sketchbooks – the amount of work and the confidence displayed by the inclusion of work you are rightfully happy with as well as pieces you have considered not so successful has been beneficial to the progression of your practice. Sometimes it is the recognition of ‘success’ and ‘failure’ that will drive us forward to constructively face. Your overriding interest in the subject of drawing will stand you in good stead for the final part of this module and your future art practice. I am pleased that you have chosen the option of figure drawing on which to concentrate.

Suggested viewing/reading Context 

I’m sure I don’t need to mention it but try as much as you can to immerse yourself in the work of other artists. I have always found it exciting when discovering the oeuvre of ‘new’ artists, the influence of their work potentially beneficial to my own. A couple of artists you may find interesting are Jenny Saville and Alison Watt.

See examples of their work below:

Jenny Saville Mother and Child (After the Leonardo Cartoon) Alison Watt charcoal on watercolour paper, 2009.
Jenny Saville
Mother and Child (After the Leonardo Cartoon) charcoal on watercolour paper, 2009.
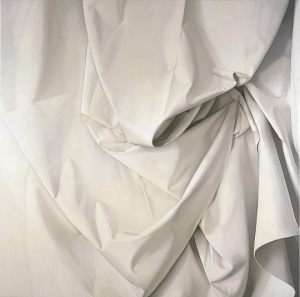
Alison Watt Part of the Phantom series, oil on canvas, 2007.
Alison Watt
Part of the Phantom series, oil on canvas, 2007.

View the research point for Alison Watt

A Fresh try at Drawing with Energy

Drawing 3

I really think I could have done a lot better in the Gesture project in the last part of this course, my Energy drawings left a lot to be desired and so I decided that I wanted to start this part of the course with a fresh try at drawing with energy.

Drawing 1
Drawing 1

I previously only browsed  through ‘Force’ by Michael D Mattesi, this time I read it and utilized it. One of the first issues that he talks about in his book was the types of lines and I had been using the infamous hairy line in my drawings and it was time to do something about it.

Drawing 2
Drawing 2

Using photos I had taken earlier I was determined to draw with smoother, confident lines putting what I had learnt from the book into practice, concentrating on directional and applied force and the road of rhythm. The results were far better than my previous attempts at gesture drawing and rarely did the hairy line raise it’s ugly head.

Drawing 3
Drawing 3
drawing 4
drawing 4
drawing 5
drawing 5
Drawing 6
Drawing 6
Drawing 7
Drawing 7
Drawing 8
Drawing 8
Drawing 9
Drawing 9
Drawing 10
Drawing 10
Drawing 11
Drawing 11
Drawing 12
Drawing 12
Drawing 13
Drawing 13
Drawing 14
Drawing 14
Drawing 15
Drawing 15
Drawing 16
Drawing 16
Drawing 17
Drawing 17
Drawing 18
Drawing 18
Drawing 19
Drawing 19
Drawing 20
Drawing 20
Drawing 21
Drawing 21

Assignment 4 – Assessment of Criteria Points

Tone and Form - 4th Drawing Fine Marker Pens

Demonstration of technical and visual skills – materials, techniques, observational skills, visual awareness, design and compositional skills

As with earlier assignment my observational skills are continuing to develop as I think shows in this assignment, assignment 4. As with other assignments, I have continued to try out different mediums, ensuring that I have used the right materials for the job and demonstrated techniques and observational skills that I have developed since the beginning of this course.

Quality of outcome – content, application of knowledge, presentation of work in a coherent manner, discernment, conceptualisation of thoughts, communication of ideas

I personally think that I have produced two good quality pieces for this assignment, (although I may have ruined one with cheap fixatives). I have applied the knowledge that I have acquired during this course to every step that brought me to the two final drawings and communicated my ideas in a way that others would understand.

Demonstration of creativity – imagination, experimentation, invention, development of a personal voice

In both the Tone and Form and Line and Shape parts of assignment 4 I have demonstrated imagination, experimentation and invention as of yet though I am not sure whether I have developed a personal voice

Context – reflection, research, and critical thinking (i.e. learning blog)

Unfortunately I haven’t had time to visit an art gallery during this part of the course but I have spent more time on my research points. My learning blog has continued to improve and I believe I am thinking more critically and being more descriptive in my entries.


Assignment 4 – Tone and Form

Tone and Form - Finished Piece Soft Pastel, Green Ingres
Final Drawing

For this part of the assignment I had to pose my model in a reclining position, such as lying back in an arm chair or with feet up extended on the sofa. That’s about all you can do really living in a one bedroom condominium with not much furniture you can lay down on, the choice was either bed, lay-z-boy or sofa, I went for the recliner.

We were instructed to dress the model in contrasting clothes,light top, dark pants etc. she wore the same white top as in the first part of this assignment but this time put on a pair of dark blue stretched pants.

Tone and Form - 1st Drawing a study in Marker Pens
Tone and Form – 1st Drawing a study in Marker Pens

My first quick sketch was in marker pens, using the same Chisel tipped marker pens that I used for both the using Markers and Dip Pens exercise and the Patrick Caulfield Research point. Even though they are nice and vibrant I decided against using them for this part of the assignment after just a quick study of her face and upper body.

Tone and Form - 2nd Drawing Conte Pencils on Ingres Paper
Tone and Form – 2nd Drawing Conte Pencils on Ingres Paper

I liked my self portrait in Conte Pencils on blue ingres paper so much  that I thought it would be a great medium to have a go with for this part of the assignment. But after a small 30 minute sketch with these on a A4 size sheet of the same blue ingres I decided they weren’t blending well enough for my liking. Also the pose that I chose for the drawing which was looking at her from the front and just slightly to the side didn’t show her form off as much as I should be doing in this part of the assignment.

Tone and Form - 3rd Drawing Compressed Charcoal A3
Tone and Form – 3rd Drawing Compressed Charcoal A3

The next drawing was in compressed charcoal on A3 paper this time I sat on a chair almost to the side of her with my light source (my bendy lamp) placed on the floor and facing her from an angle slightly to her left.

Although I was happier with both the medium and the angle, I wasn’t happy with not being able to hatch over small areas with a clumsy medium, she needed to be bigger or at a more ‘full on’ angle so I could see more of her.

Tone and Form - 4th Drawing Fine Marker Pens
Tone and Form – 4th Drawing Fine Marker Pens

The next study was in my A4 sketchbook with fine nib marker pens, although her face turned into some kind of cat woman the four colours that I chose worked well together although I did mess up on the arm of the chair but this was about describing tone and form and I still wasn’t satisfied that reclining poses in this chair was were allowing me to do that.

I gave up on it for a couple of days so I could think things through, my bed was against a plain white wall so I didn’t think the background would be interesting enough in there so I thought it might be worth drawing some poses on the sofa, However I had already used the sofa twice already in the three drawings exercise and essential elements  and I needed a pose that would fill more of the paper.

Two days later I was washing the covers of the sofa when my girlfriend came to visit again. As the sofa covers were in the wash I had a yellow quilt over the white cushion, my girlfriend was wearing a blue striped shirt with white collars and pink trousers and the three colours looked great together.

I placed the light sauce on the glass table in front of the sofa so I could create some nice shadows behind her and did a quick 20+ minute drawing in ballpoint pen. After a bit of tampering with Tipex I was satisfied that this was the perfect pose for this assignment.

Tone and Form - 5th Ball Point Pen
Tone and Form – 5th Ball Point PenT one and Form – 5th Ball Point Pen

For this drawing I wanted to use a medium that I had only experimented with before, soft pastel. I chose a dark green ingres paper but I didn’t think it would make a difference to how the picture looked as I thought I would be covering every bit of the paper with pastel, this changed as I started hatching realizing that the green of the paper still showed through the pastel strokes which changed the mood of the drawing to how actually imagined it.

Tone and Form Final Drawing Before Fixatives

I completed the whole drawing using hatching and soft pastel except for on the hands and face which I left to last and completed the details in pastel paper.

Tone and Form - Finished Piece Soft Pastel, Green Ingres
Tone and Form – Finished Piece Soft Pastel, Green Ingres

Things I am not happy with…

Well I completed this drawing at the end of the month and with hardly any money left I chose to use hair spray as my fixative. I would rather have just framed it behind glass as I thought it was very vibrant before I started spraying away. Nonetheless, it had to be fixed as I presume they have to be sent to England for formal assessment. For now it looks good, the hairspray has aged the  drawing and added some character but can it be preserved like it is.


Assignment 4 – Line and Shape

Line and Shape Finished Drawing

For the first part of this assignment, assignment 4 we were to produce a final piece using line and shape.  Instructed to take particular note of the proportions of the figure we were to describe details such as hands and facial features and find ways of describing the folds of the clothes with line rather than tone. As I have done in the other exercises for part 4 I asked my girlfriend to model for me and so I could get a good sense of form I asked her to wear shorts and a sleeveless white knitted top.

Line and Shape 1st Drawing Ballpoint

I started off by making sketches in line in my sketchbook. After the first sketch I realized that the face was going to be a problem, as I stated earlier I found it quite difficult to draw my girlfriend’s face and as this drawing was going to be in soft pencil, pen or some other permanent medium then I had to get it right the first time. The next drawing was of her face, not in line but in tone at first and from there I tried translating the key features of her face into a line drawing.

Line and Shape 2nd Drawing

I asked her to change pose for the second drawing. This pose was very elegant, it made her neck longer and her legs more womanly, at this stage I thought it would be a pose I would come back to for the finished line drawing.

Line and Shape 3rd Drawing - soft pencil
Line and Shape 3rd Drawing – soft pencil

During changing poses for the next drawing her son called her, I thought was a pose I could use and so I asked her to stay in that position, with phone to her ear for the next two drawings in both conte pencil and charcoal pencil.

Line and Shape 4th Drawing conte pencil

I decided that these two mediums (charcoal pencil and Conte pencil) were a bit too sloppy for my liking to be used in the final line drawing and so I decided on using either Drawing pen, ballpoint or soft pencil.

Line and Shape 5th Charcoal Pencil

The next sketch put me off using pencil, it would be too easy to start hatching and messing the final drawing up, drawing pen or ballpoint would be much cleaner.

Line and Shape 6th Drawing Soft Pencil

Going on the fact that ballpoint can look a bit too scratchy at times though and was probably ok for smaller drawings not at A2 size I journeyed over to Silapakorn University shop to buy a 0.3 and a 0.5 Rotring pen, both of which I would use for the final drawing.

Line and Shape Finished Drawing

The pose I chose for my final drawing was a fluke, she was trying to find the pose that I drew in the second preliminary sketch when this pose just jumped right out at me. It had everything, legs, arms, shoulders, elegant neck and goof hand positions.

Firstly I drew in the outline in an H2 pencil so I could erase it later, I was afraid that I would make too many mistakes drawing with pen first as I always seem to mess up [when the pressure’s on]. It turns out that this was a good decision, I had no problem drawing the legs, waist and hands but when I drew from her elbows up to her head everything was out of proportion and it made her look like she was leaning forward in the chair rather than sitting with her back against the back rest. I did take photos of the process to compare but sadly I deleted them by accident.

After I had corrected the proportions and completed her full outline, I quickly sketched in the door and shadows on the wall and floor, I really only had one shot at this great pose so tried to draw everything in to its proper place just in case she was getting uncomfortable or needed to go to the toilet.

The Face

From there I went over her whole figure in a 0.5 Rotring pen and then drew in her face in 0.3. With her face I kept it simple, initially in pencil I drew in a lot more details but when it came to going over her face in pen I just left in the key features. With her chin raised and slightly looking up I managed to capture the parts of her face in a way that created the best likeness, small nose almond shaped eyes and juicy top lip.

Hair

For the hair I used three pens, both Rotring pens and a fine marker to create a sense of depth.

Hands

In this pose the hands were at a great angle and very simple to draw, again, like the face I kept things nice and simple, drawing hands from the Bidgman’s Guide to Drawing from Life earlier in this part of the course was a great help. I used block shadow as well as some hatching on the hands to create a sense of three dimension.

Clothes

Thinking of drawing techniques to describe the creases and folds in the clothes was a hard one and so I settled for block shadow and short pen strokes for the knitted top and block shadow and squiggly lines for the shorts. The shorts, however turned out looking like silk Thai boxing shorts instead of cotton, 70s style boxer shorts.

Background

For me there could only be one type of background and it had to be detailed and either in charcoal or soft pencil. I went for 4B and 5B pencils. Charcoal may have been a better medium for adding depth to the drawing but to draw in the reflections and shadows on the floor that I had in mind it had to be done in pencil.

Things I am not (quite) happy with in this part of the assignment..

I probably could have done a lot more experimenting but with line and different backgrounds but a busy seven days a week schedule holds me back sometimes. Some of the exercises can be done on the go but this was something I wanted to do while the model was in front of me and not from a photo.

On the left arm (her right) I have taken the line too far over at the joint which has separated the forearm from the top of the arm, Because I am aware of it, it looks bad but I don’t know how others would see it.


Project: Self Portrait – Research Point

7 - Seventh Self Portrait in 4B

Which drawing materials produced the best results? Why?

I have produced good ad bad drawings with all tools apart from soft pastel but that was down to me being sloppy I think taking proper care with soft pastel would have also got me good results.

Drawing with pencil may have not got me the best results but it is certainly the most precise tool for the job and easily corrected which I think self portrait drawings at this stage (for me anyway) need a lot of correcting in order to get a likeness.

I loved drawing with watercolour pencil as the finished drawing really does stand out but unfortunately because the lines made with this drawing tool were so strong it made me look ten years older. I could have probably kept working on it to get more of a likeness but I didn’t want to ruin the drawing.

Until I made the last drawing the watercolour pencil was my favourite self portrait, even though the conte pencil drawing doesn’t look like me I am, it is very expressive and I am very satisfied with the results.

Does your self portrait look like you? Show it to a couple of friends or family members and note down their comments.

There is an element of me each in each one of the drawings in this project, some drawings look more like me than others. The younger students had the best comments which were mainly ‘mr Mark! Children see differently from adults the fact that all us white folk look the same also helps.

Friends and family mostly said the same thing, that they made me look older and didn’t do me justice, I do agree with them to a point, I’m only 40 and the drawings make me look at least 50 apart from the drawing below, which has the best likeness, even though the rough hatching does add a few years to me.

7 - Seventh Self Portrait in 4B
7 – Seventh Self Portrait in 4B

Did you find it easy to convert your sketches into a portrait?

My sketches weren’t converted into portraits, each portrait was a fresh drawing with my head in a different position but with each drawing I did I do think I improved a lot, the preliminary sketches  in the Drawing Your Face Exercise did get me used to ‘drawing my face’ and head and so it was a lot easier in this ‘A Self Portrait‘ exercise.

Were your preliminary drawings adequate?

I really do need a lot more practise but I do think that my preliminary drawings got me to a stage where I am quite confident to do a self portrait without worrying if it is going to look like me or not. They taught me how to he key features correct and why the shape of the head is so important for a true likeness.

Project Self Portrait : Exercise – a Self Portrait

8 - Eigth Self Portrait in Conte and Chinese White Pencil

I was looking forward to this exercise, the only other time I had done a self portrait was at the start of this course last year which was basically a 40 minute sketch to christen my sketch book. I did quite well with that and I thought I would do great after learning so much.

Self portrait in my 6 x 9 Sketchbook

I started by drawing with ballpoint in my sketchbook, the first sketch took 25 minutes and really didn’t resemble me at all. The shape of the head was good and I got the hairline just right, even the eyebrows were ok but everything else was well out. I was drawing looking into a mirror on my coffee table so it was difficult to keep the angles every time I lifted my head up from my sketchbook.

1 - First Self Portrait in Ballpoint - with hair
1 – First Self Portrait in Ballpoint – with hair

The second drawing was a bit better, I always seem to start on the left eyebrow and then draw in the shape of my head from the top of my ear to the crown of my head and then draw the rest of the top left-hand corner of my head. Then when I have something to work from I draw in my nose and then over onto the right eyebrow, shadow on the right eye and then mouth and chin, with the folds of skin from my cheeks framing my nose mouth and chin. Although this technique helps me work fast sometimes it doesn’t come together as it should do and I end up looking like someone else. I not only look older in the drawing below but from a distance I look like a posh toff with a monocle in my right .eye

2 - Second Self Portrait Ballpoint and Oil Pastel
2 – Second Self Portrait Ballpoint and Oil Pastel

Again the drawing below didn’t come together as I’d planned and I ended up looking like a completely different person with just my features all out of proportion, namely my chin and area above my upper lip/below my nose.

3 - Third Self Portrait in 4B
3 – Third Self Portrait in 4B

I showed the photos above around, my girlfriend said they don’t look like me while all my students said ‘Mr Mark’ straight away.

From there I had some light brown ingres paper left , about A4 size, so took a photo of me laid on the sofa and made a sketch in soft pastel, I should have taken aphoto of each stage of the drawing as it looked great before I messed up on the eyes and made myself look like an alien with larger-than-life eyes.

4 - Fourth Self Portrait in Soft Pastel
4 – Fourth Self Portrait in Soft Pastel
5 - Fifth Self Portrait in Watercolour Pencil
5 – Fifth Self Portrait in Watercolour Pencil

I decided it was time to draw a proper self portrait in a proper mirror, so I took my Derwent watercolour pencils and watercolour drawing pad into the bedroom and produced the drawing above in just under 2 and a half hours over 2 evenings. The drawing is spot on, it makes me look about ten years older as others have enjoyed pointing out but that’s the electric light in the bedroom. I have tried and tried to get a better photo of the drawing as it looks great but the photos I have took do not show the colour of the hatching to be as vibrant as it is in real life.


6 - Sixth Self Portrait Hard Pastel
6 – Sixth Self Portrait Hard Pastel

The drawing above was started as a hard pastel sketch to show how the left hand side of my face caught the light from a lamp directed at my face and how the most of the right hand side was left in shadow apart from part of my cheek, ear and below my eye lid and it was perfect until I messed up and went overboard on it and then ended up trying to draw my entire face in detail making this self portrait look like like a rubber horror mask from a joke shop at the seaside.

7 - Seventh Self Portrait in 4B
7 – Seventh Self Portrait in 4B

The drawing above was the second self portrait in 4B pencil, it took me an hour and a half and is a perfect likeness, one friend said that it is me in another 10 years, unfortunately I do look quite old with my specs on but it can’t be helped.

8 - Eigth Self Portrait in Conte and Chinese White Pencil
8 – Eigth Self Portrait in Conte and Chinese White Pencil

I produced the drawing above in my lunch hour at work. I left a drawing board at work for me to use when I have a bit of freeetime and I had an A4 size sheet of blue ingres paper in my sketchbook so I decided to see what I could posing in the front camera of my tablet. However when I opened my artist wrap up, all I had in there was conte pencils in black and sanguine and a Derwent Chinese White Pencil that had been sharpened to over the half way mark.

I’m long-sighted which is probably why I messed up on the other drawings with my glasses off but this one came together really well. I took it home to touch up and do do so I put t between the pages of my sketchbook, which is quite thick. When I get home the paper seemed to have been compressed inside the book and it was almost impossible to do anything with it, which is probably for the best as I am really happy with this finished piece which I feel looks great.

Project: The Moving Figure, Fleeting Moments – More Fleeting Moments

3 - Fleeting Moments - Students and Teachers Walking

After the army cleared away the protesters that have been camped out on the streets of Bangkok for the last few months the school finally opened and with me being around so much movement, I thought I would have another go at the fleeting moments exercise in the last project the Moving Figure. This time I tried to use as few lines as possible to suggest the person’s movement.

1 - Fleeting Moments - Students Being Naughty
1 – Fleeting Moments – Students Being Naughty
2 - Fleeting Moments - Students Testing
2 – Fleeting Moments – Students Testing
3 - Fleeting Moments - Students and Teachers Walking
3 – Fleeting Moments – Students and Teachers Walking


Research Point: Investigating Artist’s Self Portraits

Egon Schiele Self Portrait with Physalis 1912

Ok, for this research point I started by typing in artist’s self portraits on Google and put the artist’s into 2 groups.

Artists I’ve heard of:

  • Vincent van Gogh
  • Frida kahlo
  • Max Beckmann
  • Egon Schiele
  • Gustav Courbet
  • Pablo Picasso
  • Rembrandt

and…

Artists I haven’t head of:

  • Felix Nussbaum
  • Georges Dheedene
  • William Utermohlen
  • James Montgomery Flagg

The two groups included 4 very familiar paintings.

My tutor suggested that I looked at two books by John Berger, ‘Ways of Seeing’ and ‘Another Way of Telling’. I’ve almost finished with ‘Ways of Seeing and it’s opened my eyes quite a bit, so what I would like to do in this research point is to look at each painting and say what I see giving my own opinion of what’s going on in each painting without looking at the artist’s background.

Vincent van Gogh - Self Portrait
Vincent van Gogh – Self Portrait

It’s hard not to know anything about Vincent van Gogh so what I see in this painting is going to be tainted by my knowledge of the artist. The reason why I chose to look at the painting above is because of the colours and swirls that are obvious in his suit and background. It would be easy to say that he chose that coloured suit as a contrast to his red beard and that colour background just ‘happened’. What I see is a troubled man ‘having a go’ at creating something calm, hence the choice of colours for suit and background but then his emotions have got the better of him has he worked the oil into a frenzy, his serious expression on his face tells me that he’s getting lost in his own thoughts.

What I do notice in this painting by van Gogh is that it probably started from the eyes and then he built each part of the face and head up as he got to it rather than starting by drawing an outline of the overall shape of his head. The thickness of the paint brings his face and beard out from the background making it look almost 3D.

Frida Kahlo Self Portrait with a Monkey 1938

If I didn’t know anything about Frida Kahlo and saw this self portrait I’d have thought she had a pet monkey, but then has you start to look at more of her paintings you notice that the monkeys appear in more than one of her paintings and the rest are full of pain and suffering and so the monkey refers to her burden, her handicap the ‘monkey on her back’.

So apart from the pet monkey what else do I see in this painting, if it was me painting this I would have tried to minimize the uni-brow, still keeping it but making it less prominent. She hasn’t, along with the length of her neck she has emphasized it to show a sense of seriousness or to let the viewer know that she is fighting.

Max Beckmann Self Portrait

I know nothing of Max Beckmann just his name, and what I would say about this artist is, German, related to the pre-World War 2 expressionist movement. The bottle of champagne and the way he’s holding his cigar tells me that he’s gay and in the upper-class but then again from what I have seen of period movies the upper-class often acted camp to show they were having fun. Then again, is he having a poke at the upper-classes?

It seems like all his effort went into his face which is staring at someone or something or even listening intently to the person who he is enjoying the bottle of champagne with.

Egon Schiele Self Portrait with Physalis 1912

If I didn’t know who Egon Shiele was or read the book ‘Schiele’ by Reinhard Steiner this painting didn’t have a date on it I would have said late 1970s – mid 1980s as it makes me think about the post punk musical movements of that time. Rebellious, experimental, maybe the expressionist movement and New Wave music were driven by the same things, boredom and the need to break off and experiment. The look in Schiele’s face tells me ‘this is me, this is who I am, take it or leave it’.

Gustave Courbet The Desperate Man

I already did a research point including Gustave Courbet which brought me to this painting, as the model he is acting out a role, as the artist he is trying to capture as much emotion as he can into one pose and one facial expression, the ‘pulling your hair out look’.

Pablo Picasso Self Portrait 1906

The first word that came into my head here was ‘Negro’ and so I went to Google and typed in those words exactly ‘Pablo Picasso Negro’ and the first thing that came up was a Wiki link saying ‘Picasso’s African Period which lasted from 1906 (the date of this self portrait) to 1909. Picasso’s African Period was a period where he painted in the style of African sculptor…I learn something new every day.

Pablo Picasso Portrait 1900

In the portrait above Picasso looks like Crispin Glover in the movie Willard, an outcast. In the 1900s they were still wearing their hair brushed back and so he may have been showing his rebellious personality wearing his hair in this manner.

Rembrandt Self Portrait 1600s

I am going to have to be honest here and say I know nothing about Rembrandt apart from he was Dutch. Looking at the painting above and quite a few other of his self portraits, Rembrandt is pulling faces and from what I know through researching self portraits in this research point, he painted more self portraits that any other artist and so this is just another study of his face. If I didn’t know that I would say that he was either showing everyone how good his life was or how good he could paint!

And now for the artists I haven’t heard of..

Self Portrait in the Camp 1944 Felix Nussbaum

I think this portrait of German-Jewish Artist Felix Nussbaum speaks for itself, he’s not just painting himself but he’s painting the death that surrounds him. This is Auschwitz death camp where he was murdered a few months later. I don’t know how he got to paint this but I’m kind of glad he did, it’s a constant reminder of how evil men can be and how strong people can be in the face of death.

Last Self Portrait by Artist Georges Dheedene

The painting above is the last self portait by Belgian artist Georges Dheedene 1909-1973 (the latter being the year I was born. I look at it and the first thing that comes into my head is that it’s a portrait of a handsome old man with decent dress sense in the pipe and slippers years of his life.

William Utermohlen Self-Portrait (Green)

In the book ‘Ways of seeing’ by John Berger, there is a painting by Vincent van Gogh, and we are asked to think what we see when we look at it only to turn the page and get told that it is the last painting he painted before he killed himself.

As I was browsing the net for artist’s self portraits I came across the one above and van Gogh’s Wheatfield with Crows automatically came to mind, telling me that there was something going on in this painting, something not quite right with the artist, so I researched William Utermohlen only to find out that this was one of the last painting he produced before dying of Alzheimer’s.

This was his last…

William Utermohlen Last Self-Portrait
William Utermohlen Last Self-Portrait 2000

He died in 2007 but his wife said he actually died in 2000 when he realized he couldn’t draw anymore.

James Montgomery Flagg - Self Portrait as Uncle Sam
I Want You 1917 – James Montgomery Flagg – Self Portrait as Uncle Sam

I never realised this was a self -portrait but it is and was painted by James Mongomery Flagg in 1917. The fact that he has used himself as the model or himself as Uncle Sam tells me that he was a proud American ‘doing his part’, and earning  a decent buck for doing so.

Again this is another artist who has put himself in a role for the painting and has done so by making up for the self portrait with hat wig and beard rather than just using his imagination to age himself in the painting.

James Montgomery Flagg - Self Portrait 1956
James Montgomery Flagg – Self Portrait 1956

In both of the paintings above he has left the subject (himself) incomplete which is obvious in the first as he uses a white background so as to allow for US propaganda but in the second it is not so obvious as he merges the colour of his suit into the colour of the background, this makes him look almost ghostly or immortal… James Montgomery Flagg was an artist and at his peak was one of the highest paid illustrators in the USA, the painting above seems to be a self portrait documenting a lifetime of achievements for future generations.

Project: Self Portrait – Exercise: Portrait from Memory

2 - Portrait of Putin in Charcoal

I was watching I, Putin a Portrait, when I thought I bet the Russian president was one guy I could definitely draw from memory. I have have come across quite a few blonde Russians while I have been here in Thailand and they all seem to have the same features, long sloping noses, prominent cheek bones, chiseled features and wide mouth with thin lips.

I made some quick sketches while I was watching the documentary, I figured playing it through without stopping would give me plenty of practise so most of the small sketches are fleeting moments.

I also made some notes to help me remember the key features of Putin’s face. My long term memory is great but my short term memory is really poor.

1 - Notes and 1st Drawing
1 – Notes and 1st Drawingu

From there I started the portrait from memory starting with the nose and eyes as they were the easiest features to remember. I drew across two pages trying to get the proportions of the head right. When I was satisfied that I had got a likeness with the face I had to decide where is neck started below the chin.

The documentary showed Putin over the last 20+ years and I had produced a bit of a Frankenstein’s monster a drawing made up of images of the Russian president at different ages. I had seen him in a sweater and shirt , camouflaged jacket, shirt and tie and hockey kit.

I decided to put him in a shirt and tie which gave me some idea of how wide his neck would be and how to draw the folds of skin under his chin (turkey neck).

2 - Portrait of Putin in Charcoal
i 2 – Portrait of Putin in Charcoal

From there I did a larger drawing in charcoal on A3 paper, I was hoping to get more of a likeness with this one but it looked less like Putin than the first.

3 - Oil Pastel and Watercolour Wash
3 – Oil Pastel and Watercolour Wash

The next drawing was drawn in oil pastel and again it looked less like the Russian president than the first two, It did however have nice skin tone until I decided to experiment with a watercolour wash. I hadn’t done any washes and I had noticed a lot of other students had been doing washes over other mediums and I had never got round to playing about with them myself so I thought this was a god enough chance as any to see how an ink or watercolour wash looked over another medium.