Tutor Feedback – Assignment 2

Final Drawing on A4

Overall Comments

You have maintained a very high standard in the work you have produced for part two of this module Mark. I can see that with every new process and experimentation an even greater and more concentrated progress will occur in your practice. If you maintain this focus you will notice that your output will go from strength to strength.

Feedback on assignment Demonstration of technical and Visual Skills, Quality of Outcome, Demonstration of Creativity

Assignment Two brings together the skills you have attained from experimentation with different coloured media, the manner and method in which you use them and focuses on their suitability to subject matter and the size and format of your finished piece. It also puts you in the position of getting used to confidently employing methods in the arrangement of interesting compositional constructions and refining your ability to render form with accuracy.

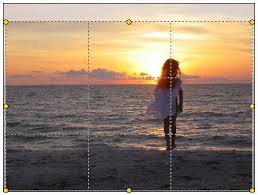
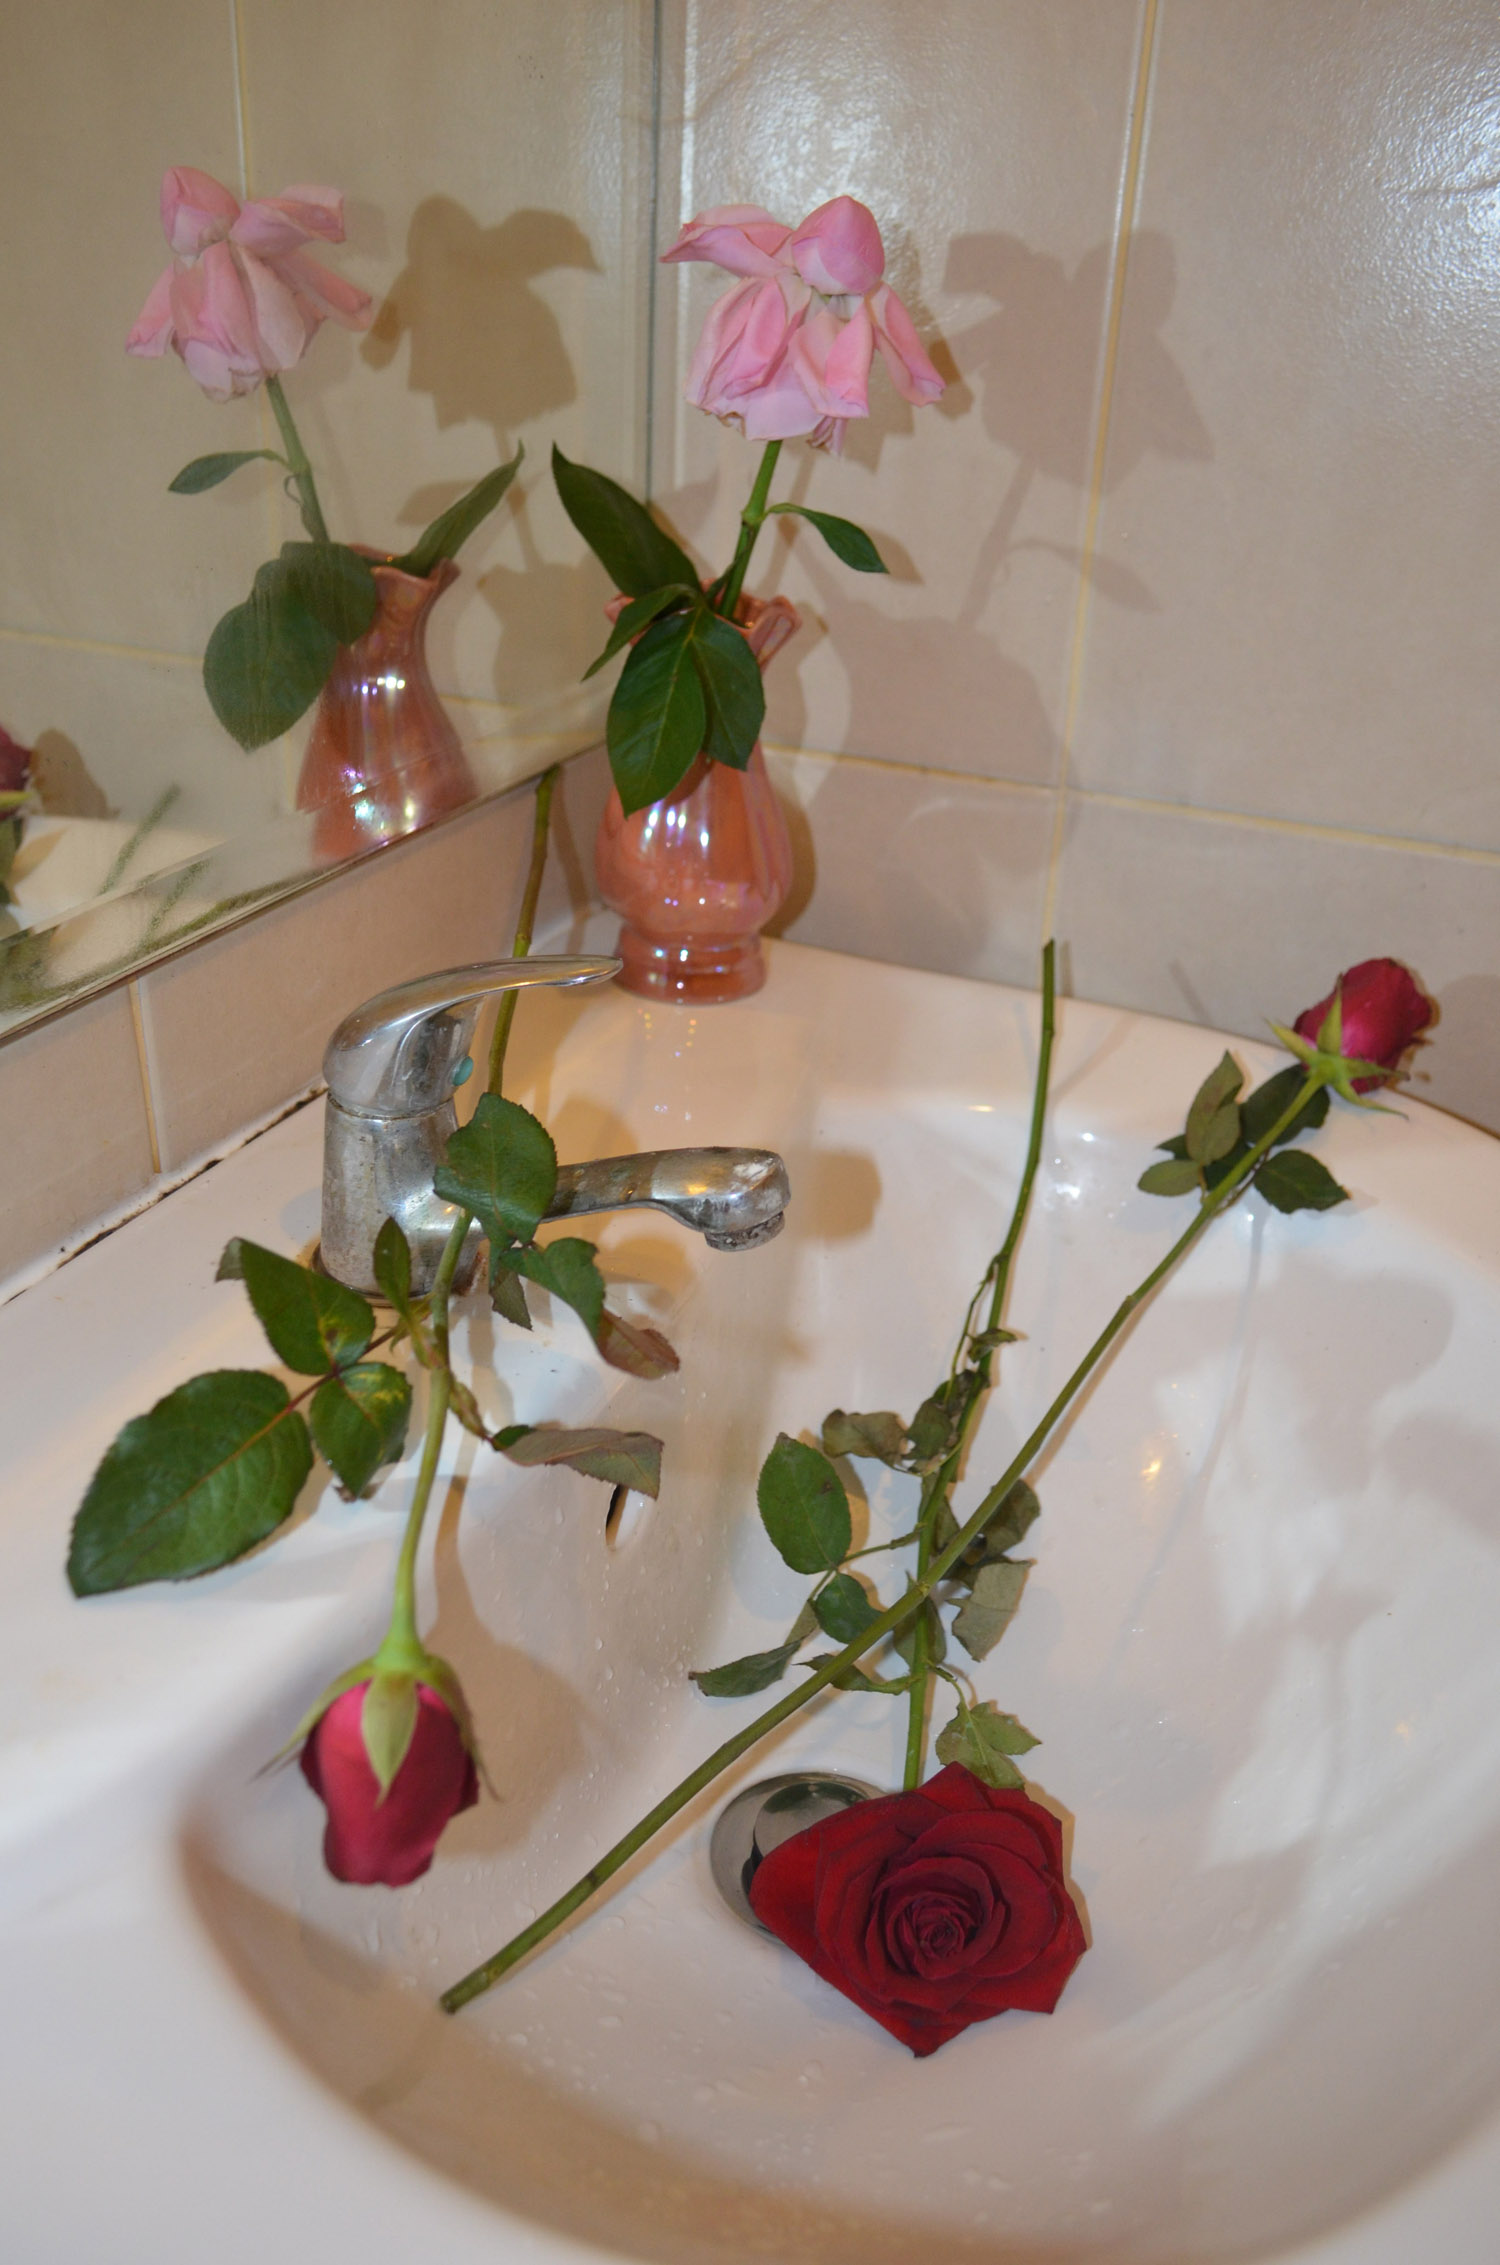
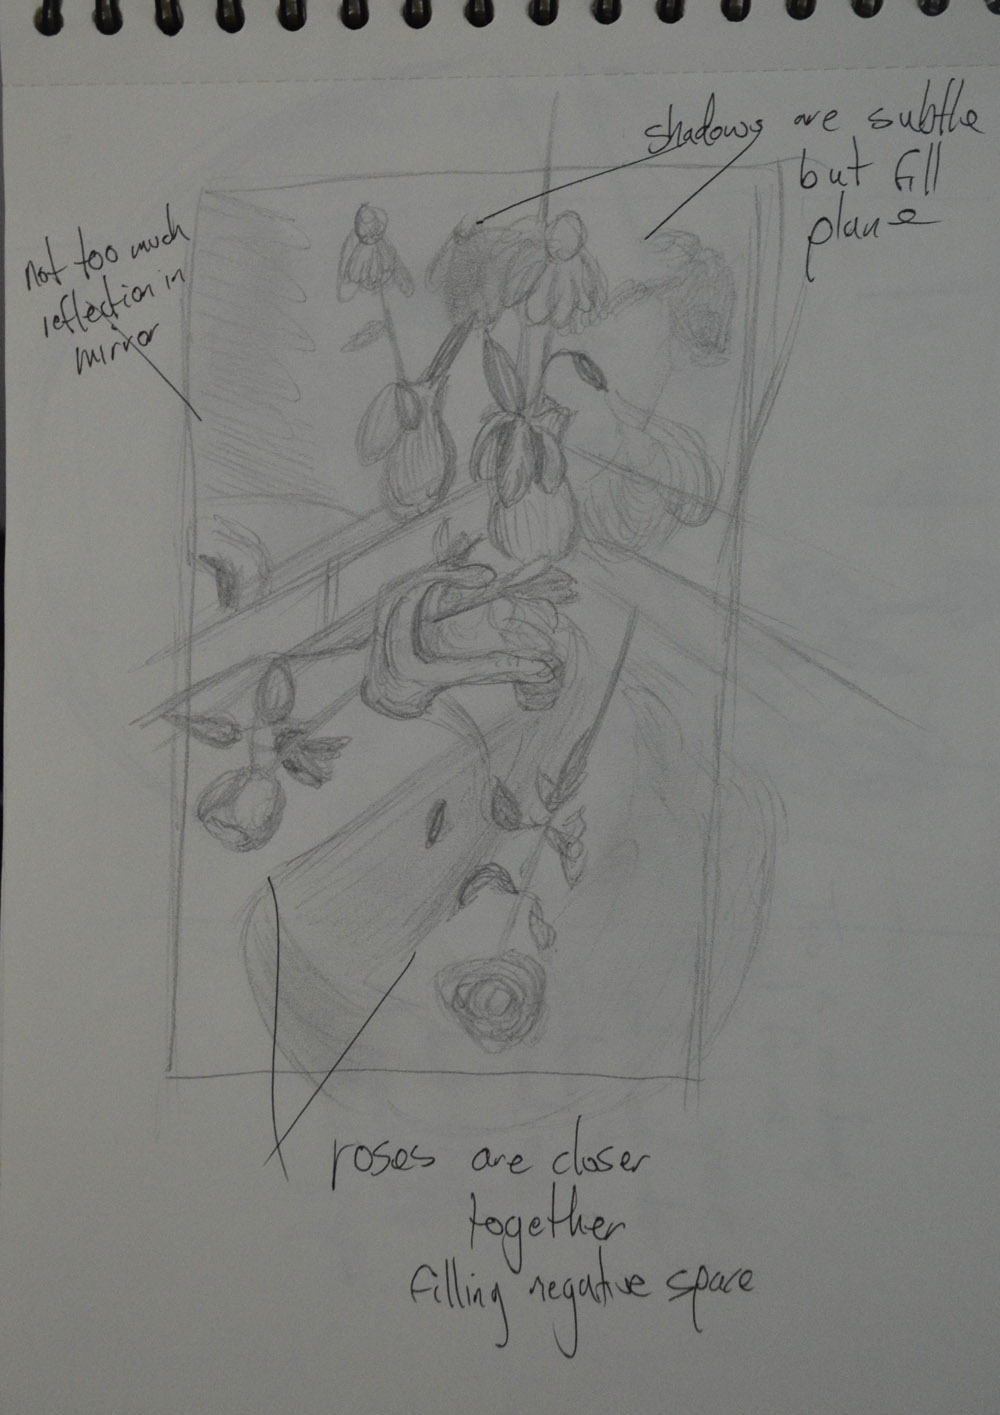
The subject you have chosen was undoubtedly an emotive one. Often these heartfelt themes can produce touching imagery and you have successfully done so with this piece. Firstly, I was greatly encouraged to see that you had diligently worked on multiple preliminary studies for the composition and had made detailed and clear annotation with regards ideas and working methodologies. The subtle colour palette utilised has a poignancy that works very well within its compositional arrangement. I was pleased to see that you had really thought about the narrative of the set up and had not fallen back on a conventional still-life arrangement. The placement of the still-life in a bathroom setting with its reflective surfaces of mirror, white ceramic tiles and porcelain basin was also a nice touch. This has strengthened the end result and added a tender feel to the piece, not to mention the inclusion of roses, which have an obvious relevancy. To be honest I feel your choice of working on white paper has worked for you – a coloured support would have made the drawing appear overworked and would have contradicted its intrinsic mood of sensitivity and restraint. It was good to read that you had used the influence of Antonio López García, an artist whose work I greatly admire. There is some very nice drawing here Mark. The delineation of form and reflective surfaces in details such as the tap and the apricot-coloured vase is very effective, as is your utilisation of the compositional device of the rule of thirds – a very well-considered piece.

Final Drawing in Pastel Pencil and Hard Pastel
Assignment 2 in Hard Pastel and Pastel Pencil

I have to admit I had never heard of the rule of thirds until now but now at least I can put an artistic phrase to it. 

Rule of Thirds
Rule of Thirds

Learning Logs or Blogs / Critical essays Context

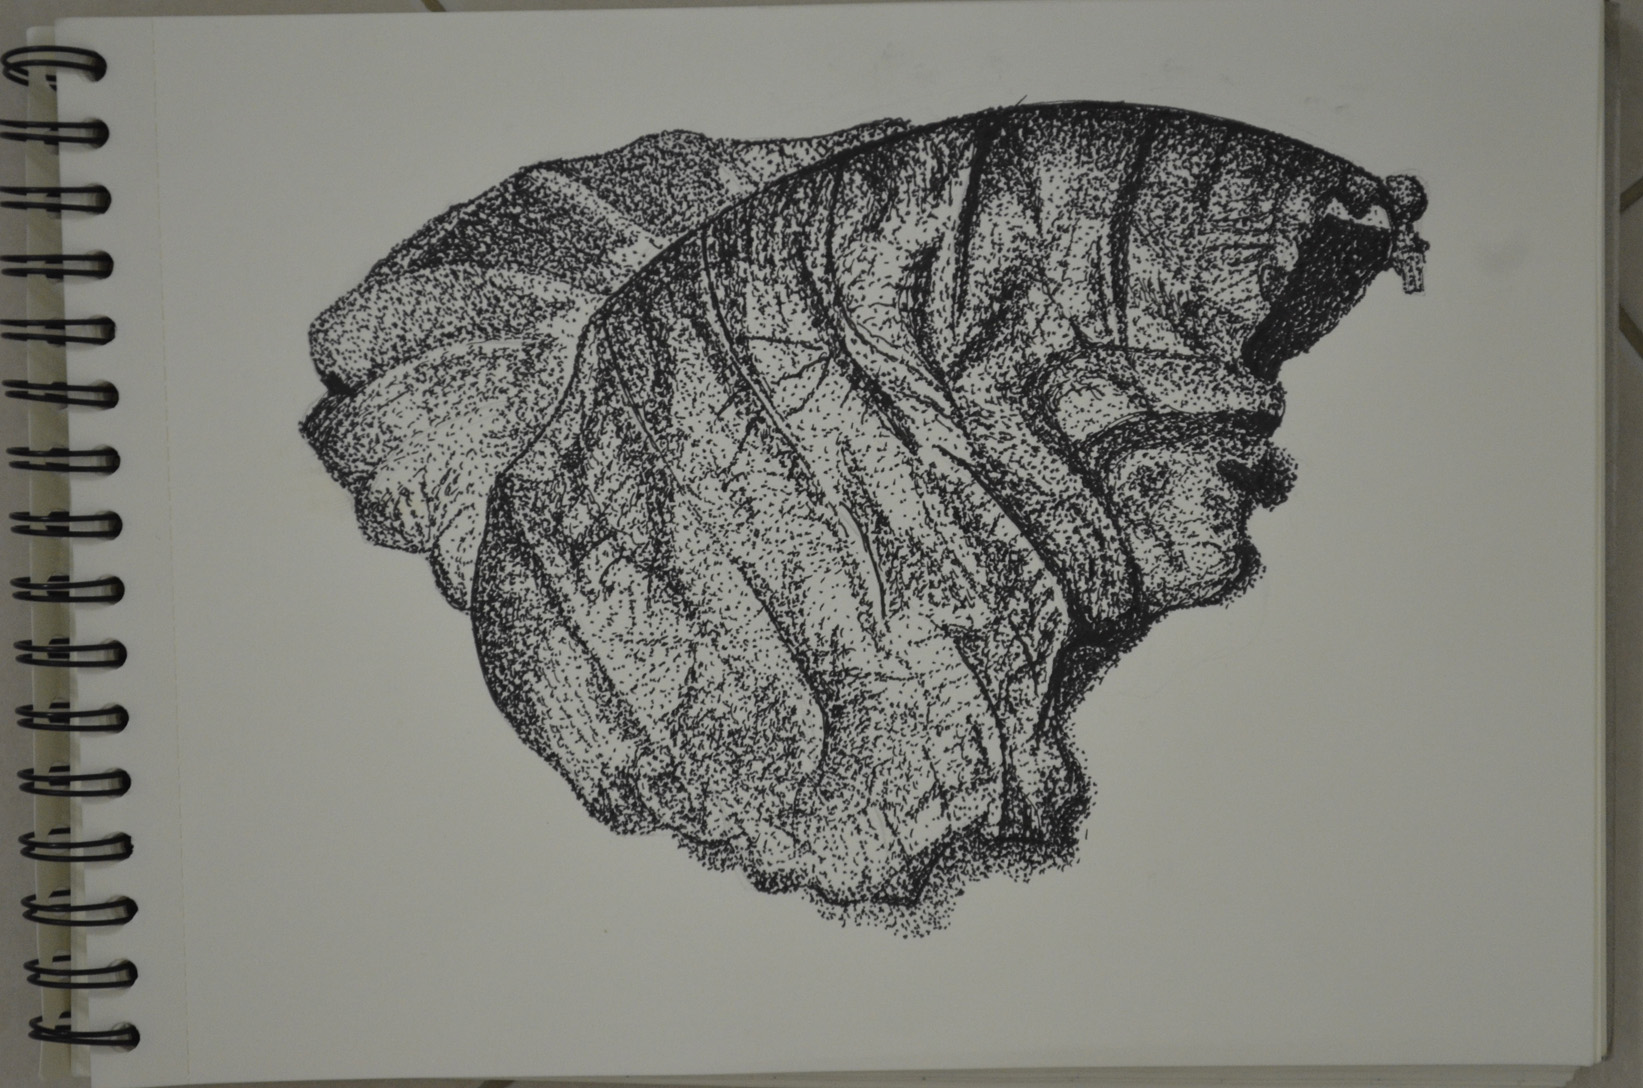
Just as in assignment one the learning log has been kept up-to-date meticulously and outlines your thoughts and discoveries scrupulously. It is a breath of fresh air to read your thorough investigation into the research points with regards your chosen artists. I read with great interest your piece about Eliot Hodgkin, an artist whose work I did not know – what a wonderful discovery. As you have suggested, his compositions and depictions of what some may call ‘mundane’ subjects, opens ones’ eyes to the beauty of simplicity. It also confirms that there is beauty in the everyday or commonplace. I can see the inspiration for your leaf drawing. I think you may find working with tempera interesting Mark. If you can’t find any, try gouache which has a similar finish and is more readily available and equally wonderful to work with.

I was hoping to try and put off tempera, gouache and any other paint mediums until the Practice of Painting Course but I made a promise to myself that I would try to get to use either one or the other by the end of this course.

Sketchbooks 

You have delivered an impressive amount of work for your sketchbooks Mark. Your adherence to the exercises within this part of the module is admirable and a high quality of work has been maintained throughout. What I find particularly encouraging is your willingness to experiment not only with a diversity of media but also the manner in which it is manipulated.  There are many good examples here and I will not mention them all: I especially liked your experiments with dip pens and markers – these display a demonstrability of eye and hand and what appears to be a natural sense for composition. I will also mention that, just as exemplified in your assignment piece, you have a knack for using colour in a way that is sympathetic to your subject, in this case, one that is fearlessly vibrant. The ‘Still-life group using line’ drawing and the study of the dying leaf in stipples and dots also show a considerable dexterity with ink as a medium.

I have to disagree with some of this, I really want to work with dip pens but I feel that I am lacking any reasonable amount of control with them and it is something I working hard to change. It was my effort with the marker pens and applying ink using a brush that made my dip pen work look good.

Chosen Composition in Marker Pens
Using Markers and Dip Pens

The leaf in stipples and dots however remains one of my favourite pieces and one that I am very proud of, It reflects the crispness of Elliot Hodgkin’s paintings as researched in the research point in this part.

Exercise - Stipples and Dots, Finished Drawing
Exercise – Stipples and Dots, Finished Drawing


I am sure the benefits of living in an exotic country are numerous but one that stands out is the wonderful fruits to choose from when setting up a still-life – obviously the watermelon and apple in the ‘Drawing using oil pastel’ exercise are recognisable but the gno is wonderful, reminding me a little of a sea urchin. The piece you have produced for this exercise displays good balance both in terms of colour palette and composition. It is a strong and lively piece and you have successfully proven that you are willing to experiment with new, untried media. The form of each fruit and its overall perspective has been effectively rendered and considered and, generally speaking, possesses a believable compositional balance. The inclusion of the yellow cloth is a bold pronouncement but works perfectly well with the overall colour palette. The detail of the diagonal folds in the cloth in the foreground is also a nice touch as it balances the slightly left-handed arrangement.  If I were to be picky however, there are things worth looking at: there is a minor inaccuracy with regards the ellipse of the plate, most noticeable at the rear edge as it disappears behind the watermelon and apple and the shadow cast could have done with a slightly darker rendering; the delineation of the reflection of the apple on the plate needs closer observation – the dark hard line and the highlight next to it in the reflection has created the appearance of a dip in the surface of the plate. Having said all that I feel this piece shows a keen observational ability and an encouraging competence in handling new media.

Again this is another piece that I feel strongly about and would like to submit it for assessment. What I let myself down on here is that I did not make any sketches of other compositions so it may be wise to make more sketches and if necessary redo the  piece.

Drawing Using Oil Pastel - Finished drawing
Drawing Using Oil Pastel – Finished drawing

The only piece I felt didn’t quite have the strength of the aforementioned drawings is the study of roses and orchids in a vase, in both colour pencil and crayon and oil pastel. My problem with it is not necessarily the handling of the media, although both examples don’t display the same confidence or strong delineation of light and shade as the others, I feel that in comparison it is its less considered composition. The close cropping or the lack of ‘breathing space’ around the arrangement needs closer scrutinisation.

Plants and Flowers in Coloured Pencil

This is a piece that I am hoping I will have the time to redo. However, I already took what I didn’t like about this composition and used what I learnt from it for my second assignment so is it really necessary?

Suggested viewing/reading Context 

It is clear that you thrive on researching the work of other artists and enjoy the process that entails. My only suggestion would be to continue doing this as it obviously has a beneficial effect on your work. With each new discovery, a new direction will open up for you. Keep up the gallery visits too! 

Pointers for the next assignment

 The next part of this module is about the outdoors and I’ve noticed you have already made a good start on the work. Try, as much as you can, to work from life rather than from photos. Although you have a keen eye and a good visual understanding of space and form it is always good practice to work directly from three dimensions. This will add an even greater perspective to your work. 

I understand your aim is to go for the Painting/ Creative Arts Degree and that you plan to submit your work for assessment at the end of this course. From the work you have shown in this assignment, and providing you commit yourself to the course, I suggest that you are likely to be successful in the assessment.

Assignment 2 – Observations in Nature

Final Drawing in Pastel Pencil and Hard Pastel

The brief for this assignment was as follows:

This assignment is designed to pull together the fine observation and practice that you’ve done on this part of the course. You’re free to choose your own subject matter and drawing Media but there are a number of important issues to consider if you’re to produce an excellent piece of work. In your work for this assignment, you must demonstrate:

  • An understanding of the use of colour in drawing.
  • An understanding of the most appropriate choice of medium for the subject and skill using it.
  • The ability to set up an interesting composition
  • Variety in mark-making, depth, contrast, tone
  • Accuracy and a demonstrable understanding of tone.

Final Drawing in Pastel Pencil and Hard Pastel

Final Drawing in Pastel Pencil and Hard Pastel

The last month was a month of heartache and arguments breaking up with the girlfriend of two years and although it did slow me down with my coursework and delay my assignment it was inspiring. The now ex-girlfriend left a dead rose at the side of the bed, one that she had saved from our first valentines day together, it did go straight in the bin on the day she left but it gave me a great idea.

For this assignment I planned to buy some roses to and throw them in the sink   and draw them where they landed (using the sink was an idea I got from my research on Antonio López García, recommended by my tutor). I went to a small florist in the department store where I work, they had a disappointing selection of roses so I purchased two small red roses a pink rose and a larger red rose all of which had had their thorns removed, which was also quite disappointing.

When I finally got round to drawing the flowers the pink rose was on it’s way out and the petals were now pointing down and didn’t look much like a rose, the two small roses had opened up, but not too much and the large red rose was in full bloom; these changes gave me a nice variation of shapes to draw.

Chosen Composition
Chosen Composition

I started off by setting up the roses in different positions around the sink and using a view finder I decided that the stem of the pink rose was too big and so I snipped it to bring the flower closer to the vase. It took me a good twenty minutes to find some decent compositions to draw, throwing them in the sink and drawing them as they fell was just not going to work!

I made a few preliminary sketches in my notebook and decided that the paper had to be in a portrait position rather than landscape in order to concentrate on the natural objects in the drawing rather than the objects surrounding them.

Preliminary Sketches - First Compostion
Preliminary Sketches – First Compostion
Preliminary Sketches - Second Compostion
Preliminary Sketches – Second Compostion
Preliminary Sketches - Third Compostion
Preliminary Sketches – Third Compostion
Preliminary Sketches - Chosen Compostion
Preliminary Sketches – Chosen Compostion

After completing the preliminary sketches I chose the composition that I thought would work best and developed it for enlarging.

Colour Pencil Study
Colour Pencil Study

Up until this stage I was positive that I would be producing the final drawing for this assignment in coloured pencil and so I did a colour pencil sketch of the rose flowers and then a pencil and coloured pencil sketch of the tap and rose leaves in my sketchbook. Here, it was clear to me that they would be no good for this assignment and I would after look at other mediums.

I went out and purchased a pack of 24 Derwent Pastel pencils and 1 x A1 sheet of fawn coloured pastel paper and 1 x A1 sheet of cream coloured pastel paper. I did not know yet which kind of pastel I would be using for this assignment or whether or not it would be good to draw on dark paper and go lighter or lighter paper and go darker, I just knew that I would be using pastels and that coloured paper was best for the coloured tiles in the bathroom.

Colour Pencil Study
Colour Pencil Study

I decided that it was best to use the lighter paper and go darker and so I would use the darker paper for two more colour studies one in oil pastel and one in pastel pencil. I tore the A1 size paper into two halves and did two almost identical enlarged drawings and  decxided to do the first drawing in oil pastel. There were parts of the drawing that would have been good in this medium but other parts I decided would just not work, I wasn’t prepared to mess up in my final drawing with a sloppy medium when the brief said I should be focusing on accuracy and so I refused to complete the full drawing wasting more time.

Study in Oil Pastel on A2 Pastel Paper

The second study in pastel pencil worked a lot of better and at some stages  of the drawing I actually thought that I could submit it for more my final drawing and so I spent a few hours completing it. Towards the completion stage I realised that the flowers were too close to the edge of the paper and the perspective of the flower laid across the top of the open rose was way out but completing the drawing helped me to decide on the different techniques I would use on the different subjects in the drawing.

Study in Pastel Pencil on A2 Pastel Paper

By the time it came to work on my final drawing the flowers were long gone so I was working from a photo again. I decided that vthe composition still needed further development and so I put a photo of the original composition into Photoshop and used Photoshop’s guides to help me perfect the enlargement for my final piece on the cream sheet of A1 pastel paper. With pressure now on final piece I wasn’t prepared to mess up and so there is a lot of white showing through in certain parts of the drawing which I left for the sake of overworking and messing up.

I decided that in the final piece I would not only use pastel pencil but also hard pastel as I could cover bigger areas with the flat of the sticks of pastel. The only problem with this was that it was hard to layer the white over the darker colours and so I did mess up in certain parts of the shadows.

Assignment Criteria Again:

  • An understanding of the use of colour in drawing.

Above everything I think I did very well in demonstrating the use of colour in drawing. Before this part of the course I would have probably used several colours on each piece and kept ‘trying’ throughout the drawing. In this assignment I started off with the lightest colours layering the darker colours over the top and got the results that I wanted.

  • An understanding of the most appropriate choice of medium for the subject and skill using it.

Apart from regretting using hard pastel in places, I think I did well choosing the right medium for this drawing. With the subtle shadows and colours reflected off the sink and the deep reds in the flowers, Pastel pencil was the best choice.

  • The ability to set up an interesting composition.

Absolutely! And I am positive it shows in this assignment.

  • Variety in mark-making, depth, contrast, tone

There are aspects of this drawing where I could have done better in all three of these categories but overall I think I did very well to show what I have learnt in the first two parts of this course, mark-making, depth, contrast and tone.

  • Accuracy and a demonstrable understanding of tone.

I really try to focus on accuracy at all times, I do think that I have shown accuracy and a demonstrable understanding of tone in this assignment however being modest I still have to say that there is most definitely room for improvement.

Still Life – Check and Log

1st Attempt at Dip Pens

What aspects of each drawing have been successful, and what did you have problems with?

Still Life Group Using Line

I drew this drawing from scratch without sketching in pencil first in this aspect I think I did really well. However I found it very difficult not to start hatching to depict tone and so I probably went overboard on the pumpkin but I feel that it was better to but too much effort in than two little.

I was also dissatisfied with the pumpkin because the actual surface wasn’t as rough or bumpy as what I made it out to be in my drawing. In both drawings.

Still Life Group in Tone

The only problem I had with this is I should have chose a composition that used up more of the paper. I also could have been more adventurous with the subjects that I chose. Apart from that I think I did really well with depicting tone and none of the objects look out of place.

Did you manage to get a sense of depth in your Drawings? What elements of the drawings and still life groupings helped create that sense?

This is one thing I did not have a problem with with the Still Life Group Using Line exercise I did this by placing the tallest objects at the back. With the Still Life Group in Tone I looked down at the group from an angle.

What difficulties were created by being restricted to line or tone? 

Like I said earlier sometimes it was very difficult not to cross the fine-line between drawing with line and hatching.

Drawing Animals: Check and Log

What were the main challenges of drawing animals?

I would say that the main challenges for me were unique to the subjects that I chose. For one ‘s very hard to capture movement with ravens as they don’t stand still for long. Unlike a dog or cat the only time you can catch a bird sleeping is at night in a tree basically, so I had to capture movement with sketches as well as photos. Texture was also a challenge, birds feathers are very complex and have a different texture in different parts of the body.

Which media did you enjoy using most and which did you feel were best for the subject matter and why?

Grabbing the Chance Finished Drawing

As always I enjoyed using the ball point pen the most, for the sketches of the ravens in Grabbing the Chance. With the ball point pen and the colour of the raven’s I could almost do a continuous drawing of the birds. Coloured pencils were great for the finished drawing in grabbing the chance, they captured the details well and were great for layering all the different colours but they weren’t dark enough to capture the deep colours of the bird. hard pastels may have been better for the job.

Where can you go to draw more animals?

The only real place in Bangkok to draw animals unless you have a pet or live in a street where the stray dogs run freely is the zoo. I went to the zoo with the intention to draw different animals but came across the ravens while there.

Research Point: Dog Anatomy and George Stubbs

George Stubbs an engraving from The Anatomy of the Horse

In this research point we were asked firstly to look at the skeletal structure of the cat, dog or horse and then secondly t research the anatomical drawings of George Stubbs.

The Skeletal Structure of a Dog

For the first part of the research point I decided to take a look at the skeletal structure of a dog, I’ve never been that interested in domestic cats, big cats on the other hand are a different story.

Firstly I found a great little video on YouTube showing the skeleton of a dog while trotting, getting familiar with the animal in motion I think is important when depicting movement in drawings.

Dogs have the same skeletal structure all though the length and shape of the bones changes from breed to breed with difference in height, width and length a Dachshund for example would have short leg bones compared to say a Great Dane and an English Mastiff would have a broad rib where as a Greyhound would have a deep rib cage. The biggest noticeable difference being the size and shape of the skull.

Skeletal Structure of the Domestic Dog

The canine skeleton is into two sections which are the Appendicular skeleton which includes the front and back legs and hips and the  Axial skeleton which includes the  includes the head, spine, tail and chest area.

Skeletal Sttructure of a Daschund
Skeletal Sttructure of a Dachschund

When looking at the dogs skeleton for the first time it’s amazing to see how much leg there is above the knee and even in the Dachshund skeleton the legs are suprisingly long.

Great Dane and Chihuahua Skeletons
Skeletal Structure of a Greyhound

The Anatomical Drawings of George Stubbs

Mares and Foals in a River Landscape 1763-68
‘Mares and Foals in a River Landscape’, 1763-68 (oil on canvas)

I can’t lie, I had never heard of George Stubbs before taking this course and to be honest paintings of horses in front of beautiful scenery have never really interested me, for some reason they remind me of sitting in gloomy houses on rainy days. Over my 40 years I have probably seen prints of George Stubbs’s paintings many times in families and friends homes and the surrounding environments have never really made them stand out. Not that I wouldn’t pay them the respect they deserve if I saw the actual paintings in a gallery environment.

Whistlejacket, is a name that I have heard before, but I’m not sure from where, looking at the painting it does look quite familiar and this unlike say ‘Mares and Foals in a River Landscape’, is not only a very likeable painting but the detail he has captured in this work is quite stunning not only has he managed to capture the muscle tone in every part of the horses body but he has depicted perfectly the texture of the horses hair in its body, main and tale. I love the way he has captured the defined muscle in the back legs to depict how the back legs are taking the weight of the rest of the horse as it rears up. It is a very beautiful piece and reminds me of the Study of a Horse by Leonardo da Vinci that I posted in my previous research point.

George Stubbs an engraving from The Anatomy of the Horse

I absolutely love his anatomical drawings they’re quite dark and are more up my street than his finished pieces. Looking at the Dorsal View off the Muscle Structure of a Progressively Dissected Horse, Study No.7 from The Anatomy of the Horse, 1766 you can see how this study of the muscles in the hind legs of the horse has informed him of how the muscles should look in different positions, and how even after the completion of Whistlejacket, a painting that he was commissioned to paint by the 2nd Marquess of Rockingham of her champion racehorse 4 years earlier he was still persistent to take his realistic paintings of horses to the point of perfection.

Stubbs was born in Liverpool in 1724. His father was a currier and as a child he would help his father in his job stretching and burnishing leather for the local tannery. He moved to a remote farmhouse in Lincolnshire in 1756 with his lifelong partner, there he began work on ‘the Anatomy of the Horse’ a book of engravings illustrating the many layers of the horse’s anatomy from its skin to its skeletal structure.

He had a ready supply of cadavers (horse corpses) from a nearby tannery which he strung up from the roof on hooks in different poses as required. He thoroughly recorded his dissections with drawings and notes at every level as he peeled the creatures through their skin, muscle and all the way down to the skeleton. The book took him 18 months to complete and was finally published in 1766.

George Stubbs Skeleton of a Horse

In ‘The Skeleton of a Horse’ 1766 (engraving) he has captured the stance of the horse so well that it seems to be a live like an x-ray or CGI skeleton and you can definitely see how this has helped him capture the spirit of the horses in his finished paintings.

Bibliography:

http://www.artyfactory.com/art_appreciation/animals_in_art/george_stubbs.htm

http://www.wikipedia.org/

http://www.youtube.com/watch?v=fyot9IlVw1c

Drawing Animals: Fish On a Plate

Completed Exercise - Fish on a Plate

In this exercise I was to buy a fish and put it on a decorative plate, setting the plate in a neutral context. Ideally using water-soluble pencils to draw the fish, paying special attention to the , way the light catches the fish’s eye, mouth, gills, body and tail.

Well my first obstacle was to buy a fish as we have a totally different variety of fish here in Thailand than the UK so I chose a fish called a Pla Tha Pien which maybe a Java Barb or Gold Foil Barb. It wasn’t a very attractive fish but it did a really good job of catching light.

Completed Exercise - Fish on a Plate
Completed Exercise – Fish on a Plate

I didn’t have a really nice plate either in fact I am a bit of a minimalist and only had one plate until last week so I used the same plate as I had used in other exercises.

Photo of Subject - Barb on a Plate
Photo of Subject – Barb on a Plate

The next obstacle was the paper, I couldn’t find any Bockingford paper and the closest I could find to it was a Canson Cotton paper that was over 50 pounds for a pad and on my budget that just wasn’t happening, so I bought a cheaper Canson paper that stated ‘Wet and Wet Technique’ and ‘re-workable’ on the front, at only 420 Baht or 8 pounds for 20 I thought that was reasonable, slightly smaller than A3, A3 being the size of the really expensive next step up.

I wasn’t very clear on the ‘water-soluble pencils’ it said in the brief for the exercise, I have a small pack of Derwent water-soluble sketching pencils, water-soluble colour pencils by Masterart and a pack of Watercolour pencils by Faber-Castell, so I used the latter.

I tried wetting the paper first and it warped like hell and after an attempt at drawing on it I decided that it would be best to draw, go over it with the brush and then draw again while the paper was still wet, this technique worked.

With a limited pallet of colours but not too limited and the way I positioned the bendy light over both fish and plate it was easy to see what colours I should use on the different parts of the fish, the only problem I could see was how I would go about drawing the texture of the scales on the fish’s body.

Fish on a Plate - head

The head was easy enough and didn’t take long to complete, I used 5 colours in total on the head drawing dry then going over with a wet brush to blend and then re-working where necessary and I am pretty pleased with the results on the head which I think looks very like my subject.

Fish on a Plate - body
Fish on a Plate – body

From there I worked on the underneath of the gills and the belly and then up through the fins to its top side. On the side of the fish I used very similar colours as I did for the head but a very different drawing technique, I found that hatching in a light blue, light green and light pink over the top of each other created an almost scaly texture which I then went over with a wet brush and then filled in some of the diamonds with a dark grey.

Fish on a Plate - detail
Fish on a Plate – detail

The most difficult bit of the fish was the top and the front of the dorsal fin as when water touches black it becomes a bit too dark especially for a drawing like this. I have looked at several tutorials which say if you have to use black use a dark blue , which would not be suitable for this fish. In the end I did use black but over the top of an already damp paper and then went over it with a cotton bud to catch some of the colour.

Fish on a Plate - fish complete
Fish on a Plate – fish complete

The finished drawing is not brilliant but for the time I spent on it I’m quite happy with the results. The only part of this picture I am not happy with is that I rushed the completion of the violet coloured cloth that I used for a background.

Drawing Animals – Grabbing the Chance

Grabbing the Chance ball point pen 4
Grabbing the Chance Finished Drawing

For this exercise ‘Grabbing the Chance’ I was a bit clueless t first on how I would go about it. I live in an apartment where the only pets u see are the ones on the posters telling you you can’t keep pets and all my friends live in apartments where they are not allowed to keep pets.

I thought about going into the Sois (back streets) and sketching mangy dogs which would probably have been a great subject apart from the fact that dogs here in Bangkok are nocturnal and by the time I would get round to sketching them they would be walking around, barking and biting.

I decided to take a day out to the zoo with my two young daughters, the only problem with this is that my daughters are too impatient to wait for me and sit down and sketch so I took my small sketchbook and my trusty camera.

I started to walk round with my kids taking pictures of the animals that were there and like I thought, my kids were running in front shouting ‘next one, one’. My big surprising break came ten minutes into our zoo visit, at the KFC within the zoo grounds, we got our order and sat down to eat at the tables outside only to be mobbed by hundreds of Ravens, my favourite bird. Being the 5th most intelligent animal in the world and an amazingly beautiful creature I find it very inspiring.

I took plenty of photos of which the photos above are just a few of the best ones plus I managed to do a series of simple pencil sketches working from the real life birds and the screen on the back of my camera and with the kids finishing their meals I decided that I would do some more sketches at home and we finished the rest of the tour of the zoo.

At home now a few days later and looking back at the sketches I did at the zoo I wasn’t very impressed so I took out my trusty ball point pen and made a better second attempt. As this exercise is indeed called ‘Grabbing the Chance’ and I should be drawing the animal like I am ‘grabbing the chance’ I made some quick ball point pen sketches in the same notebook not taking more than 15 minutes a drawing.

This time I could see that my drawings of the bird were improving, after all I had been sitting looking at the photos for the last few days studying their structure how their wings folded on their backs, their feet, their upper and lower beaks and taking note of any other details that would help me to get their anatomy correct. It paid off, this time I was quite impressed with the ballpoint pen  drawings and the best thing about the Faber Castell you can smudge them as they dry slowly so this helped me to create some of sense of texture.

From there I made some sketches with a Rotring 0.3 drawing pen and then moved onto making some pencil sketches with a B5 pencil in my larger A4 sketchbook which I think are great the animals looked bold and elegant and are definitely worthy of a big final piece. Rather than work from the sketches, I chose to work from a photo as I wanted to get the colours somewhere near, firstl I did a study in colour in soft pastel then decided to do the finished piece in coloured pencil as I needed the practice.

Inspired by ‘Wing of a Blue Roller’ by Albrecht Dürer in last research point I paid close attention to detail in order to give the bird the respect it deserves. I took into consideration all I had learnt in previous projects ‘Using hatching to Create Tone‘ and ‘Still Life Group in Tone‘ plus a few other lessons and began drawing the animal.

The finished drawing isn’t a perfect likeness which I am not too worried about my aim here was to draw at a decent pace and I have seen that these birds come in different shapes and sizes. The anatomy however is correct and I have done well to reproduce the folded wings using texture and by depicting the light shining off the birds back.

I drew the outline of the bird with a 2H pencil, at first I thought that I hadn’t made a good attempt at filling up the paper then realised that that this was how I saw the bird, ‘busy bodying’  away from the center to have a nosy around and so I just carried on and I am pretty impressed with the final drawing.

Research point: Renaissance Masters and Animals

Leonardo da Vinci “Study of horses”, red chalk on paper, 1504-6

Research point: Look at how Renaissance masters such as Leonardo and Dürer depicted animals

During the Renaissance period (14th-17th centuries) Europe became the academic heart of the world with Renaissance scholars absorbing the knowledge acquired from other older cultures such as vanishing the Islamic world. Like many other areas of study during this period, both biology and natural science became progressively more specialized and began to take on their own identity.

The Renaissance began a cultural revolution that seemed to be driven by art and science at this time was no different, in fact it was the artists and sculptors of the Renaissance period seeking perfect realism in their work that brought anatomy and biology to the forefront of all scientific areas.

Renaissance artists were the first to dissect plants and animals for a better understanding of the living world. From this artists were able to create more energetic and realistic works of art and make the connection between the structures of animals and humans; Leonardo da Vinci was undoubtedly one of the first scholars to do just this.

Leonardo da Vinci (1452-1519)

These days described as the first animal rights activist Leonardo da Vinci would often go to the markets and buy caged animals to set them free. In several of his works Da Vinci combined art with science. This combination of art and science is especially clear in his depiction of animals.

To render the animals in his works with scientific precision Leonardo not only studied the anatomy of the animals but also their physiology. But too really depict them with scientific precision he performed dissection on a number of animals as well as studying their movement in their natural habitat.

Cavillo di Leonardo - 1490 c
Cavillo di Leonardo – 1490 c

Nowhere is it more obvious as in his ‘Cavillo di Leonardo ’ (Leonardo’s Horse 1490 c) right. Not only has he managed perfectly reproduce the animals stance and bowed head but the wonderful muscle tone and folds around the neck.

Leonardo da Vinci “Study of horses”, red chalk on paper, 1504-6

In ‘Study of horses’ red chalk on paper 1504-6 which I think is actually a ‘ A Study for the Battle of Anghiari’ he focuses on the horse’s hind legs especially on how the defined muscles and tendons giving an impression the horse’s legs are buckling under weight. To me this is a prime example of how his scientific studies helped him to achieve this standard of realism.

Albrechct Durer (1471-1528)

Born in 15th century Nuremberg, Germany into the Northern Renaissance period, Albrecht Dürer was the son of a goldsmith who taught his son to draw, hence Albrecht’s appreciation of fine detail. Dürer is undoubtedly one of the greatest oil painters of the Northern Renaisssance but is also famous for his superb watercolours as well as woodcut prints and engravings.

Until the superb quality of George Stubbs’s work elevated animals in art in the 18th century animals were not thought of to be ideal subjects and the drawing of animals was considered to be merely a demonstration of an artist’s technical skill. However almost two centuries before Stubbs, Dürer began to view animals with the attention they deserved and demonstrating this with an array of watercolours and woodcut prints that over time have become increasingly popular and widely reproduced.

Albrecht Dürer Wing of a Blue Roller 1512

Albrecht Dürer was a familiar name to me and I was especially familiar with his painting ‘Wing of a Blue Roller 1512′ an image I have come across time and time again, and it’s a always been a goal of mine to create something similar being inspired by this wonderful piece.

The painting Is a perfect example of his exceptional drawing skill, ‘he uses watercolor to delicately blend the soft graduating color of the plumage and overpaints linear detail with gouache (an opaque watercolor) to pick out the jagged edges of the feathers.’ [3] He has managed to capture the contrasting textures of the feathers and down of the wing perfectly with so much realism that you can almost feel it.

Albrecht Dürer Rhinoceros 1515 pen and ink drawing

Dürer created this pen and ink drawing of the Indian rhinoceros based on notes and a sketch by an unknown artist from Lisbon who had obviously been a traveler and seen the animal with his own eyes. However Dürer had never seen this animal for himself and recreated the drawing enhancing the anatomy of the animal by adding an extra horn to the Rhino’s back. The rhinoceros had not been seen in Europe since Roman times and Dürer’s image of the animal was generally accepted as being anatomically correct until the 18th century. Again, even though he had never seen the animal for himself, he has almost managed to recreate the exact texture of the animal.

[1] http://www.medievalists.net/2011/05/10/leonardo-da-vincis-representation-of-animals-in-his-works/

[2] http://explorable.com/renaissance-biology

[3] http://www.artyfactory.com/art_appreciation/animals_in_art/albrecht_durer.htm

Drawing Plants and Flowers – Check and Log

How will your experiments with negative space help your observational drawing in the future?

Before I even started this course I was very aware of negative space but this course as made my awareness of it a lot more acute. I no longer just look at the negative space in and around the subject but the negative space between objects, Negative space plays a big part in all subjects whether it be a plant, landscape or the space between facial features in a portrait and being more aware of this will help to improve my observational skills with all.

What techniques did you use to ensure you drew  your plants in proportion?

Negative space played a big part in this for me throughout this project I started at with one part of the subject and then worked my way around using the negative space between flowers and leaves piecing it together like a jigsaw. I then altered the shapes of the flowers and leaves where necessary.

How did you achieve an effect of three dimensional space in your drawings?

Firstly the way I arranged the flowers was a big help with the biggest at the front and the smallest at the back with the biggest flowers at the front acted as a focal point. The earlier exercise Still LIfe Group in Tone was also a big and drawing the overlapping plants and their cast shadows also helped me to create an effect three dimensional space.

Drawing with Other Coloured Media

Drawing with Crayons and Oil Pastels

In this exercise I used the same subjects as the Drawing Plants and Flowers in Coloured Pencil exercise and drew them in a variety of other coloured media, using Watercolour pencil, marker pens (fine and chisel nibs) and coloured pencil, watercolour pens, crayons and oil pastels.

Due to the choice of mediums and that I would be using them together I used watercolour paper for both of the drawings that I did in this exercise, knowing that the watercolour pencils and markers would react better with watercolour colour paper and hoping that the crayons and oil pastels would cling better to the rough texture of the papers surface.

Drawing with Crayons and Oil Pastels

I started the first drawing with the intention to use a lot more coloured media on this but it turned out to be a personal experiment to see the difference between oil pastels and wax crayons. With the wax crayons, I didn’t have much of a range of colours as I was using some I had bought from my kids a few months back but luckily enough there was enough colours for the subjects in my arrangement so I went through the arrangement flower by flower, leaf by leaf weighing up the advantages of each of the mediums. On the watercolour paper I found that the oil pastels clung to the paper a lot better than the wax crayons which left alot more white space than the pastels. I also found that the colours of the  oil pastels were a lot more vivid. Layering over the top of the wax crayons with oil pastels was a lot easier than the other way round. It was also easier to get a better stroke with the oil pastels than with crayons as the tip of the crayons rounded off to easy. Nonetheless, both mediums, in my opinion, are better for the parts of the subject with less details such as the flowers rather than leaves; this would change with the size of the sheet of paper used.

Drawing with Markers, Water Coloured Pencils, Crayons and Water Coloured Pens

For my second drawing I used a wider variety of coloured media inluding marker pens (chisel and fine tips), coloured pencil, watercolour pencils as well as watercolour pens and wax crayons. Starting with the orchid flower like I did in the previous two pictures I worked my way around the arrangement. For the orchid I used markers mainly chisel tip and with no red available for the last layer I used coloured pencil which really worked well on top of the markers. I drew the other orchid flowers above in wax crayon an they looked somewhat drab against the bright colours of the markers.

The mixed mediums that impresssed me the most were the fine markers over the top of watercolour pencil for the red roses, the outcome of mixing these two mediums was a lot more impressive than coloured pencils in the last exercise.

The watercolour pens (watercolour felt-tip pens) which are actually quite bright when used by themselves were very dull over the top of damp watercolour pencil, however they did blend quite well, somewhat uncontrollable but I feel with a bigger sheet of paper and more practise they could be used quite well together or just the pens by themselves.

Watercolour pencils were suited to drawing the flowers but not so suited for the detail in the different leaves in the composition they were also a good base for using other mediums over the top.

I don’t really like wax crayons maybe because of the feel on the paper or that they seem to need a lot of hard work to get your drawing looking anything like you want it too but then this could be down to the type of paper used.

All in all I thought this exercise was a lot more time consuming than drawing in coloured pencil but that boiled down more to the thought process than anything else. I am not too happy with the results but it was great getting to know what the different mediums could do together.