Drawing Animals: Fish On a Plate

Completed Exercise - Fish on a Plate

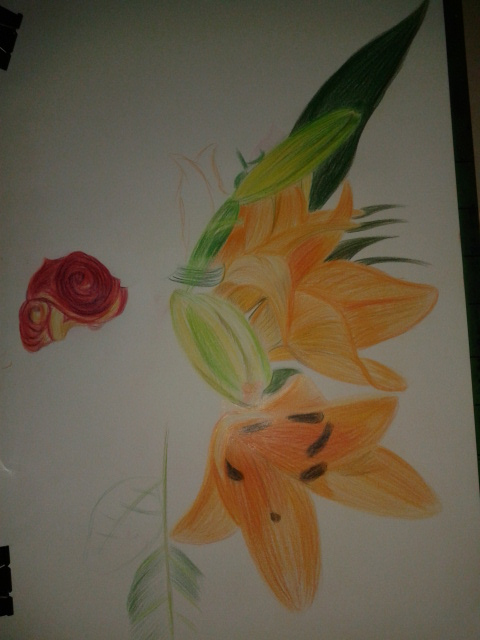
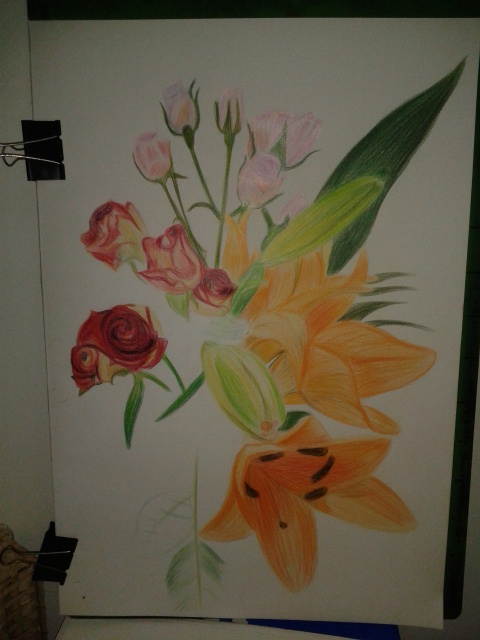
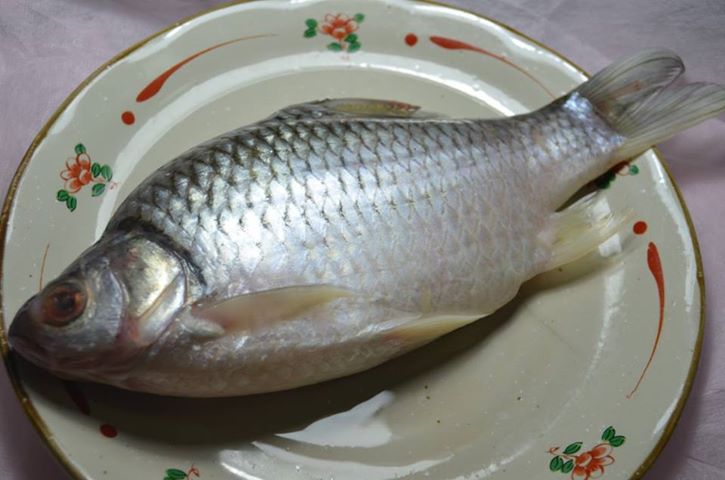
In this exercise I was to buy a fish and put it on a decorative plate, setting the plate in a neutral context. Ideally using water-soluble pencils to draw the fish, paying special attention to the , way the light catches the fish’s eye, mouth, gills, body and tail.

Well my first obstacle was to buy a fish as we have a totally different variety of fish here in Thailand than the UK so I chose a fish called a Pla Tha Pien which maybe a Java Barb or Gold Foil Barb. It wasn’t a very attractive fish but it did a really good job of catching light.

Completed Exercise - Fish on a Plate
Completed Exercise – Fish on a Plate

I didn’t have a really nice plate either in fact I am a bit of a minimalist and only had one plate until last week so I used the same plate as I had used in other exercises.

Photo of Subject - Barb on a Plate
Photo of Subject – Barb on a Plate

The next obstacle was the paper, I couldn’t find any Bockingford paper and the closest I could find to it was a Canson Cotton paper that was over 50 pounds for a pad and on my budget that just wasn’t happening, so I bought a cheaper Canson paper that stated ‘Wet and Wet Technique’ and ‘re-workable’ on the front, at only 420 Baht or 8 pounds for 20 I thought that was reasonable, slightly smaller than A3, A3 being the size of the really expensive next step up.

I wasn’t very clear on the ‘water-soluble pencils’ it said in the brief for the exercise, I have a small pack of Derwent water-soluble sketching pencils, water-soluble colour pencils by Masterart and a pack of Watercolour pencils by Faber-Castell, so I used the latter.

I tried wetting the paper first and it warped like hell and after an attempt at drawing on it I decided that it would be best to draw, go over it with the brush and then draw again while the paper was still wet, this technique worked.

With a limited pallet of colours but not too limited and the way I positioned the bendy light over both fish and plate it was easy to see what colours I should use on the different parts of the fish, the only problem I could see was how I would go about drawing the texture of the scales on the fish’s body.

Fish on a Plate - head

The head was easy enough and didn’t take long to complete, I used 5 colours in total on the head drawing dry then going over with a wet brush to blend and then re-working where necessary and I am pretty pleased with the results on the head which I think looks very like my subject.

Fish on a Plate - body
Fish on a Plate – body

From there I worked on the underneath of the gills and the belly and then up through the fins to its top side. On the side of the fish I used very similar colours as I did for the head but a very different drawing technique, I found that hatching in a light blue, light green and light pink over the top of each other created an almost scaly texture which I then went over with a wet brush and then filled in some of the diamonds with a dark grey.

Fish on a Plate - detail
Fish on a Plate – detail

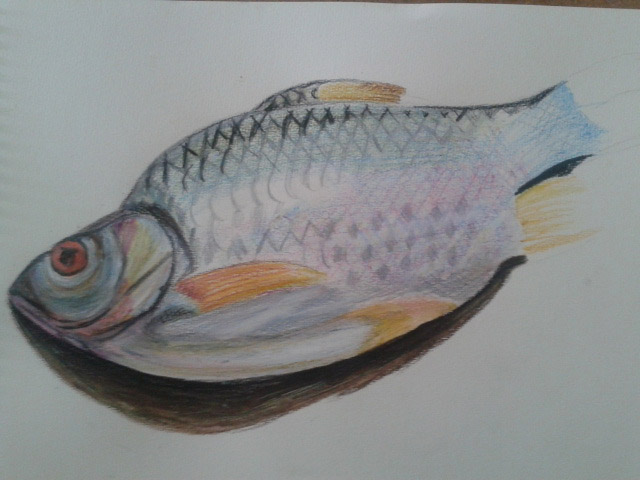
The most difficult bit of the fish was the top and the front of the dorsal fin as when water touches black it becomes a bit too dark especially for a drawing like this. I have looked at several tutorials which say if you have to use black use a dark blue , which would not be suitable for this fish. In the end I did use black but over the top of an already damp paper and then went over it with a cotton bud to catch some of the colour.

Fish on a Plate - fish complete
Fish on a Plate – fish complete

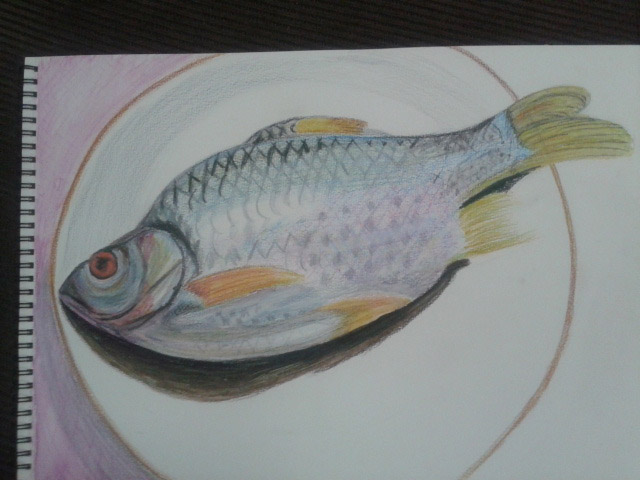
The finished drawing is not brilliant but for the time I spent on it I’m quite happy with the results. The only part of this picture I am not happy with is that I rushed the completion of the violet coloured cloth that I used for a background.

Drawing with Other Coloured Media

Drawing with Crayons and Oil Pastels

In this exercise I used the same subjects as the Drawing Plants and Flowers in Coloured Pencil exercise and drew them in a variety of other coloured media, using Watercolour pencil, marker pens (fine and chisel nibs) and coloured pencil, watercolour pens, crayons and oil pastels.

Due to the choice of mediums and that I would be using them together I used watercolour paper for both of the drawings that I did in this exercise, knowing that the watercolour pencils and markers would react better with watercolour colour paper and hoping that the crayons and oil pastels would cling better to the rough texture of the papers surface.

Drawing with Crayons and Oil Pastels

I started the first drawing with the intention to use a lot more coloured media on this but it turned out to be a personal experiment to see the difference between oil pastels and wax crayons. With the wax crayons, I didn’t have much of a range of colours as I was using some I had bought from my kids a few months back but luckily enough there was enough colours for the subjects in my arrangement so I went through the arrangement flower by flower, leaf by leaf weighing up the advantages of each of the mediums. On the watercolour paper I found that the oil pastels clung to the paper a lot better than the wax crayons which left alot more white space than the pastels. I also found that the colours of the  oil pastels were a lot more vivid. Layering over the top of the wax crayons with oil pastels was a lot easier than the other way round. It was also easier to get a better stroke with the oil pastels than with crayons as the tip of the crayons rounded off to easy. Nonetheless, both mediums, in my opinion, are better for the parts of the subject with less details such as the flowers rather than leaves; this would change with the size of the sheet of paper used.

Drawing with Markers, Water Coloured Pencils, Crayons and Water Coloured Pens

For my second drawing I used a wider variety of coloured media inluding marker pens (chisel and fine tips), coloured pencil, watercolour pencils as well as watercolour pens and wax crayons. Starting with the orchid flower like I did in the previous two pictures I worked my way around the arrangement. For the orchid I used markers mainly chisel tip and with no red available for the last layer I used coloured pencil which really worked well on top of the markers. I drew the other orchid flowers above in wax crayon an they looked somewhat drab against the bright colours of the markers.

The mixed mediums that impresssed me the most were the fine markers over the top of watercolour pencil for the red roses, the outcome of mixing these two mediums was a lot more impressive than coloured pencils in the last exercise.

The watercolour pens (watercolour felt-tip pens) which are actually quite bright when used by themselves were very dull over the top of damp watercolour pencil, however they did blend quite well, somewhat uncontrollable but I feel with a bigger sheet of paper and more practise they could be used quite well together or just the pens by themselves.

Watercolour pencils were suited to drawing the flowers but not so suited for the detail in the different leaves in the composition they were also a good base for using other mediums over the top.

I don’t really like wax crayons maybe because of the feel on the paper or that they seem to need a lot of hard work to get your drawing looking anything like you want it too but then this could be down to the type of paper used.

All in all I thought this exercise was a lot more time consuming than drawing in coloured pencil but that boiled down more to the thought process than anything else. I am not too happy with the results but it was great getting to know what the different mediums could do together.


Plants and Flowers in Coloured Pencils

Plants and Flowers in Coloured Pencil

For this exercise I bought an assortment of flowers from the Tops supermarket while I was visiting my kids for a meal for my oldest daughters Birthday. The flowers I chose were orchids and some red and pink roses, I really was not thinking about shapes or colour when I purchased them but I am glad I made the choices that I did. On an A2 sheet of white paper I began to draw.

Roses and Orchids
Roses and Orchids

Now the brief said to experiment with different methods of blending in my sketchbook first, however I thought I had had enough practise blending colour with colour pencils so far in this course so I put pencil straight to paper, for the flowers this was no problem but for the leaves I wish I had done as the brief said and practised a little more.

Drawing the Orchid
Drawing the Orchid

I began with a neutral colour for each subject starting with the orchid and working my way around the composition working on the most prominent flowers and leaves first keeping a careful eye on negative space.

Part way through the drawing I read the brief again to find out I had skipped over some valuable instructions:

  • Make the plant the focal point of your drawing but draw the background
  • Do not draw the plant in isolation
  • Draw in the context to give depth and substance to the drawing

The background I had chosen was a plane white wall with brown skirting boards and very pale floor tiles but I decided to carry on and I am glad I did. Using three different types of flowers with large leaves and petals on the orchid the composition and the vase I had placed them in made up the main subject and the background. Placing the largest flowers at the front and the smallest at the back helped me to create a nice three dimensional effect with the large orchid flower taking on the role as the focal point of the drawing.

I used different methods of blending for each of the flowers with layering used on all, the Still Life Group in Tone Exercise early on in this part of the course really helped using 3-4 colours on each flower but starting off with the lightest colour first and working my way to the darkest.

I used long strokes for the orchid to give it a stretching outwards feel and to me it almost seems like it as a life of its own.

Drawing in the Red Roses

For the red roses I coloured them in a spiral motion then layered the darkest colours over the top rubbing out the colour from time to time to let the lighter colours show through.

Flowers Complete
Flowers Complete

The pink roses were the most challenging of the lot with the colours and details being so delicate I decided to tackle them in a different way by hatching then squiggling over the top for the flowers where you can see the petals grouped together.

Aspects of the Drawing I am Satisfied with:

I am really happy with the 3 dimensional feel of the drawing and the way the different solutions I came up with to tackle each type of flower pad off. I am also very happy with way the drawing came together using the practise I had from the Negative Space in a Plant Exercise helped me to piece the drawing together like a jigsaw.

Plants and Flowers in Coloured Pencil

Aspects of the Drawing I am not happy with:

As always I wish I had read the brief again and again until I was clear on what I had to do but then this would have lead to a one or two plant composition  which would have probably been a lot less challenging.

I wish I had practised blending colours in my sketch book if just for the leaves and stems, although not all the leaves and stems are clearly visible I can see that I definitely could have improved on the blending on those parts of the flowers.

The final drawing is very sketchy although this is a big difference from some of the final drawings in part 1 of this and I know I allowed the the sketchy artist I researched earlier to influence me in this exercise I would have preferred a more realistic finished  drawing.

Still Life Group in Tone

Still life group in tone

After the last exercise ‘Still Life Group Using Line‘ this exercise sounded like it was going to be a breath of fresh air and indeed it was…

Still Life Group in Tone

I started with a bit of a study to firstly get the right composition for this exercise and then to try out different colours so I could find three colours that would give me three different tones for this drawing. I feel like I cheated on this exercise as I chose objects that could be drawn easily enough with just three colours, a yellowy green banana, an apple and two green bananas but I just started a high fruit diet the week before and I used objects that were at hand.

Like it instructed me in the brief I screwed up my eyes to take a look at the dark colours only and lightly sketched them in and then chose a different colour to sketch in the mid tones, then another for the light tone. On completion of the initial sketch I decided that my darkest colour was too light and so changed it for my final drawing.

Still life group in tone

I changed the composition of my final drawing slightly so I could depict the full form of the apple and I’m glad I did. The final drawing took me less than two hours going at a really steady pace and I am really satisfied with the completed drawing and my choice of colours, It would have been nice to apply a fourth colour though and also maybe a variation in orange and reds.

The one thing I am not happy with is the amount of blank space I left on the paper but I tried to make up for this by shading with my darkest colour.

Still Life Group Using Line

Still Life Group Using Line 2

In the brief for this exercise I was to set up a still life group out of objects at my disposal, either objects that naturally connect together or deliberately contrast. For this I did a supermarket shop and purchased onions, a big chunk of knobbly Asian pumpkin and a red cabbage thinking about three objects that gradually went from rough to smooth.

I had to think about the following questions: ‘How will I treat the objects?’, ‘How will their connections be clear?’, ‘How will I capture the differences between the objects?’, ‘How do the objects relate to their background? and ‘How will I reference the colour in the group in this drawing?.

Then with these questions in mind I had to select a medium such as pen and ink, marker pens or fine black pen and A3 paper and begin to draw; which is exactly what I did. I wanted to use pen and ink for this drawing as I have kept delaying it but when i saw I would be using them in the next project I decided to use a Rotring 0.3 drawing pen.

My objects had already been in the fridge a couple of days so they wouldn’t last long once I took them out and my SD card for my camera kept locking due to me removing it too often so I had to work fast as I couldn’t get a photo to work from in case I didn’t finish before evening came.

 Still Life Group Using Line 1st Drawing
Still Life Group Using Line 1st Drawing

There was no drawing this out in pencil first for me, I wanted to do start as I meant to go on and and put my Rotring drawing pen to paper. I started on the outline of the three objects together rather than drawing them individually then when the outline was complete I finished the shape of each object individually.

From there I started on the lines of the onion which were fairly simple and while I worked my way around the onion with a variation of light and dark lines (applying different pressures) I thought about how I was going to approach the different objects. Working from right to left I tackled the red cabbage next and it was extremely difficult; trying to view the patterns as a whole and then working on the lines individually was enough to drive me crazy.

The pumpkin was the next obstacle and because this was a still life group using line I had to exaggerate the texture of the pumpkin at certain parts where there was no real pattern at all. It looks like I have tried my hardest to depict tone here but actually I wasn’t thinking about tone at all. I was just trying to complete the surface of the pumpkin with as many different line as possible, squiggly lines, short strokes, anything that came to mind.

The cabbage leaf on the right of the drawing was probably the most difficult object in this drawing and was very difficult to draw without hatching to depict it’s smoothness which I wasn’t very successful in doing so.

Then when I finished the composition I ruined the whole picture by doing some stupid speckle background and so I decided to have another go.

Still Life Group Using Line 2

This time I tried a slightly different angle and the finished drawing was cleaner but there are a lot more things that I am unhappy with. For one I don’t know how the cutting board got so out of shape the cabbage leaf didn’t turn out that great and the pumpkin surface was a little too exaggerated but certain parts of the pumpkin surface turned out a lot better.

Exercise – Stipples and Dots

Exercise: Stipples and Dots Finished

For this exercise I was to pick another interesting object and use A4 cartridge paper and a ballpoint or drawing pen. Then use a stippling effect, dots and and a variety of marks to create a drawing of depth and interest.

Exercise - Stipples and Dots, Finished Drawing
Exercise – Stipples and Dots, Finished Drawing

After my research on Eliot Hodgkin I took a walk through the very small park area opposite my school and took some photos of leaves with my mobile phone so I might use them later. When this exercise came up I went back into the park to grab some dying leaves to take home.

Exercise - Stipples and Dots, Leaf Subject
Exercise – Stipples and Dots, Leaf Subject

One particular leaf caught my eye as it had some great lines and at the time was half green half brown, so took many photos during the change from green and brown to completely brown and also tried the leaf at different angles, for my drawing I picked out the one above.

I can’t say that I love stippling as it is a very slow process and this exercise took me about three hours over two days to complete and since my first assignment was handed in quite slow I’m trying to keep up momentum.

I used a Rotring 0.3 drawing pen and began as I did with other exercises, drawing the light tones by spacing out the dots  and then going back over for the darker tones with more dots. I used a variety of mark making techniques which included stippling, dots, really short hatching and lines and for the creased patterns of the dying leaf I drew the dots in tracks close together and then went back over with more dots.

Exercise: Stipples and Dots Finished

Line Drawing Detail

Exercise - Line Drawing Detail Second Subject 2

For this exercise I was to select an object with interesting detail such as a sliced through red cabbage or a fir cone. Then on a sheet of A4 paper create a line drawing of the object that I set up, taking time and effort to really look at the patterning, thickness of line, texture and shape of the overall composition. The brief also said that I was to position the drawing well on the paper and fill the paper effectively with a continuous line drawing and no shading which is what I TRIED to do…

I made a few attempts at this with two different subjects, both of which were green peppers but in the Bangkok heat they go off pretty quick. With the first pepper every attempt was a continuous drawing with minimum detail, I used the thick nib of a double tipped felt pen and although the subject fit well on the paper, I didn’t give it a strong enough light source to pick up all the detail and too be honest the finished drawings at that line thickness all looked somewhat pathetic.

Exercise - Line Drawing Detail First Subject
Exercise – Line Drawing Detail First Subject

I gave it a week with another exercise in between before I had another go at this exercise. Visually the drawings with the second subject look a lot better, I used the finer nib of the felt pen and this time after I completed what I could do continuously without taking my pen off the paper I decided to add the detail which were the ribs on the inside of the pepper that I could see from wisely using a light source this time.

Exercise - Line Drawing Detail Second Subject 1
Exercise – Line Drawing Detail Second Subject – Image A

I probably did go a bit overboard and it does look like I have had a go at shading the object but this is all down to the closeness off the lines on the inside of the pepper. However I am quite happy with the results.

Exercise - Line Drawing Detail Second Subject 2
Exercise – Line Drawing Detail Second Subject – Image B

The thing that I am not happy with however is the positioning on the paper and how much space I left to the sides and underneath it. When drawing an object such as a pepper with a very irregular shape I think it’s best if you know where to start, in Image A above I started at the core just above the seeds. With Image B I started at the tip of the stem Starting near the center of the image was better with this object but that would differ with something like a cabbage.