This was only the second time working with my girlfriend as a life model and so it was a nice little exercise to introducing her to posing for me for longer periods of time.
1st Drawing – A Practise with Charcoal
I started with a practise sketch to get me used to drawing with charcoal on the large A2 pad. For this I let the girlfriend sit on the floor with her back against the bed. She lives in a studio apartment which is basically a bedsit. The proportions were out as there wasn’t much measuring going what I really wanted to know from this trial drawing was how well I was going to work with compressed charcoal on the large sheets of paper.
The introduction to this project pointed out ‘basic shapes are used to construct three-dimensional fundamental forms…The head is a sphere, arms and legs are cylinders, and the feet and hand are ellipses’ and with that I decided to puppetize my girlfriend.
With me being new to life-drawing I decided to start with a simple pose where there was only a slight twist in the central axis, this first pose with arms straight down, parralel to the edge of the paper helped me to ‘establish the bulk of the drawing in relation to the space around it’ as suggested in the brief.
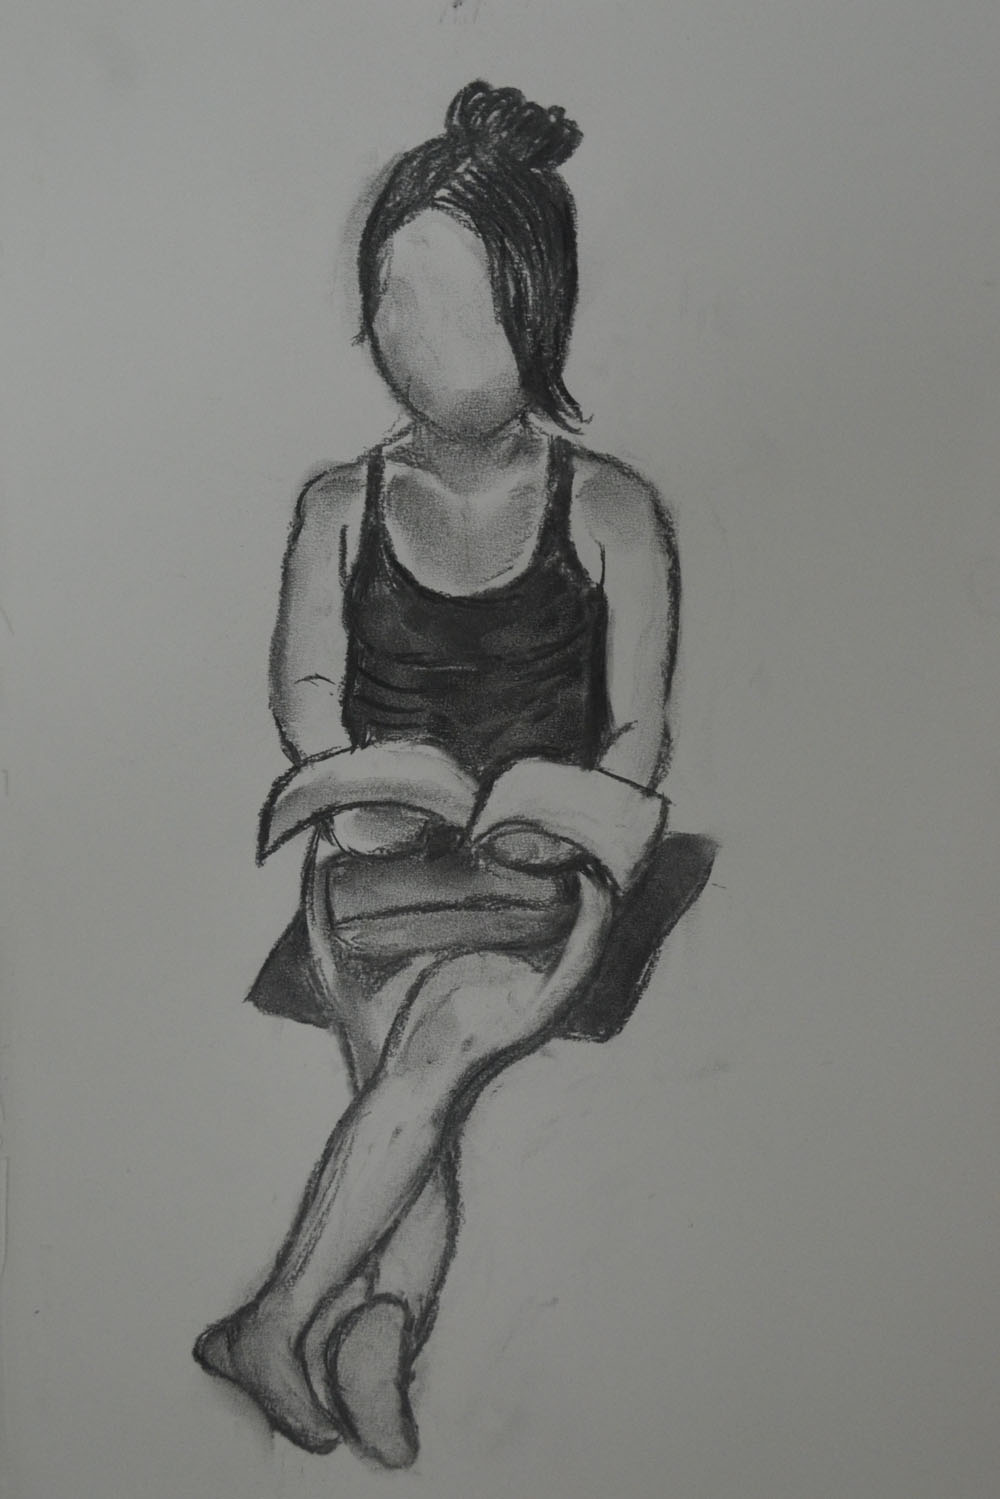
2nd Drawing Sat on Bed A2
The second pose was very similar to one that I didn’t do a great job on in the ‘Quick Poses‘ exercise but this time with ample time to measure, using the head as a marker and remembering what I learnt earlier that the head fit into the torso approximately 4 times to the seat of the backside on the seated figure, the results were satisfying.
3rd Drawing Sat on Bed 1 Leg Up A2
My girlfriend is very small in height, just over 5 foot so for the next sketch I asked her to sit very close to the edge of the mattress so I could draw both her feet on the floor. I started by using a sanguine conte pencil but realised it was pretty permanent and couldn’t mess about with it as much as I could the Conte, the lines wouldn’t erase but it didn’t matter too much and I decided to go over it in Charcoal. The result of this gave me an idea for depicting movement which may come in handy later on.
4th Drawing Charcoal over Conte
I picked up the wrong stick of charcoal for this next drawing that was rather scratchy and almost impossible to smudge in with my fingers but I decided to keep going. This time I thought I would have a go at drawing a face, wish I hadn’t, not in this medium anyway. The girlfriend has an unusual face, she comes from Thailand’s most northern province and probably most northern town and she has a very ‘Thai’ face not like the Bangkok/Chinese faces I’ve been used to seeing over the last 15 years and so any attempt at a face would have to be in a medium that I could play around with.
5th Drawing – Compressed Charcoal and an Atempt at a face
Again I added a few more details toes, fingers, ankles but worked fast and kept the sketch nice and scratchy with squiggly hatching.
6th Drawing in Hard Pastel on A3
The last drawing was from a photo in hard pastel, I was teaching at the language center and popped upstairs to the art store where there were Nouvel Carre Pastels on sale and wanted to see what they were like and also needed to see what could be done in hard pastel in this part of the course.
Have you managed to make a complete statement within this time? What were your main problems?
Within 2 minutes? No, there is definitely a lot more time needed at this stage, however, with more practise drawing the human figure, two minutes could be enough to make a statement of a sort, more so with ten minutes. With one hour in ‘The Longer Pose‘ I do feel I managed to make a complete statement but the drawings did suffer with consistency.
Problems…
1. I have this knack of drawing the bodies really well with flowing lines but then when I get to the head and face I tend to tighten up and give the subject Action Man/Thunderbirds’ like features. I don’t know how other people see the drawings but that’s what I see.
How well have you captured the characteristics of the pose?
In the 2 minute life-drawing sketches In the ‘Quick Poses‘ exercise I would say about 50/50 I can see the original pose in what I captured on paper but then I would say that others probably wouldn’t get it. But then in ‘The Longer Pose’ exercise I would say ever I have managed to capture, in the pose, what draw me to it in the first place.
Do the proportions look right? If now how will you try to improve this?
In the quick poses the sketches do seem to be out of proportion in 2 or 3 but I think this was down to excitement more than anything else, it was the first time I had done any life-drawing and I was also worried that the model (my girlfriend) would be uncomfortable so I rushed my strokes. All the sitting poses however were in proportion and measured the same from the head to the seat of the backside.
The Brief for this exercise was to ‘Go for a walk in your local park, around your garden or somewhere you normally walk. Find a view that you like or are familiar with and use your viewfinder to help you focus on a point of interest. This could be a trees, a gate or a road.’
I had been working irregular hours over the last month as schools were on holiday and I had been working in the language center and with pretty earlier sunsets in Thailand I spent most of the day time I had left doing cloud drawings for the third exercise in this project. Finally I dropped on lucky with two days off which it turned out I needed for this exercise alone.
The only suitable place for this exercise and probably most of the others in this module is a place called ‘Suan Rot Fai’ (Suan=Park, Rot Fai = Train) which is basically a large park on the outskirts of Bangkok with lots of trees, lakes, grass, sculptures and a rotting train. So I set out armed with my artists wrap, filled with different pencils and charcoal and my viewfinder that I made in the first part of this course to see what I could draw. After a long walk around the park getting familiar with the sites, sculptures, trees and other landmarks, I decided that it was more like Disneyland than a park with scaled down replicas of famous Thai landmarks and a kind of theme park with traffic lights and statues of strange looking Asian Cartoon figures. Being spoil- for-choice on what to draw I made the decision to get some sketches of more natural looking subjects.
The first subject that caught my eye was some kind of park keepers shed, which was a bad choice for me really because when it comes to drawing any kind of structure like this I like the perspective to be perfect and although I followed the brief and didn’t erase any mistakes I might have made, I drew very slowly and the shed itself took me at least 30 minutes. It was in a great location and the trees above cast some lovely shadows which I think I did well to catch and I think I managed to do a great job depicting the light reflecting off the glass shutters at the side. When it came to drawing the trees I think I also did quite well but I could have chosen a better technique on drawing the leaves on the trees although the focal point of the picture, the shed, takes your mind off the rubbishy bits.
A Sketchbook Walk First Sketch : HB Pencil
Bangkok is very flat and the first time I rode around this park on a mountain bike this year I realised that this was probably the only place in Bangkok that had sloping paths so I took the opportunity to make the second sketch of a path swooping round a bend it was about 4:30 in the afternoon by now and in Thailand time that’s nearly twilight so I had to work a lot faster now and I realised that this was probably going to be my last sketch of the day, not just because I didn’t think I’d have enough time to do another before it got dark but also because the park was filling up with people jogging and on bikes as the Thais don’t like to get sun tans and so they come out as the sun is going down.
A Sketchbook Walk Second Sketch : HB Pencil
This time I started by drawing the snaking outline of the cycle path and the trees on the left hand side of the road. There was a hell of a lot of trees here for my liking and it was difficult to see where the trees in the background came up to behind the trees in front but to be honest I think I did quite well drawing them and the light that shone down the short grass behind them. I also think I did quite well drawing the trees at the back on the right hand side of the road but totally messed up drawing thee trees closest on the right. However like the first drawing with the road acting as the point of focus it kind of takes your mind off how badly drawn they are.
The light shining on the road through the branches and leaves above was a challenge so I decided to go about this by hatching across the road to show the shadows coming off the trees, smudging the pencil lines with my finger and then erasing the areas of light with a putty rubber then where needed hatching again over the top for more shadow.
Day 2
To do the last two sketches I came out again the next day which was unfortunately a public holiday so I was limited for where I could sketch in peace as the park was full, so much for not wanting to get a sun tan.
My third subject was something that I thought would be a lot easier to draw and found extremely difficult, logs against a tree. I sketched in the tree first to give myself a starting point with the logs and taking advantage of the negative space started work on the chopped down chunks of tree. However the hardest thing was making the logs look like logs as the texture was quite difficult to replicate in a quick sketch the tree behind however was a different kettle-of-fish I spent more time on that and I think I managed to pull off the texture quite well.
A Sketchbook Walk Third Sketch : HB Pencil
Behind the tree was a miniature junction painted on the floor-fail! I did love drawing the shape of the big trees in the background though, I can’t wait to start drawing trees later on in this module, there are some great eucalyptus trees in the park. The grass was also a task as it was very patchy and the grass in Thailand is very different from the grass in the U.K., more like a weed than grass. Overall I am not very happy with this drawing but it was the quickest so far I just have to improve before I start drawing the 360 degree studies in 15 minutes per drawing!
With the park being pretty full I found myself in places where the Thais wouldn’t go or at least wouldn’t be distracting me walking around in the background so I found myself looking at this clearing and with the sun beating down and everything in the foreground looking very dark it was the perfect opportunity to pull out my charcoal pencil. I had been using an HB pencil for the first three pencils and just wanted to use something different so I began with a charcoal pencil to draw in the tree, which when I finished reminded me of a Klimt painting for some reason then I drew in shadows with an EE, taking the shadows up to the road, drawing in the road with HB and then taking the shadows over the road.
A Sketchbook Walk Fourth and Final Sketch : Charcoal Pencil, EE and HB
Unlike the previous picture the grass here was real grass and perfectly cut so instead of having to draw individual blades i simply shaded then smudged. This time for the branches of the tree itself I left the squiggles alone and used and drew the leaves with marks similar to those used by Albrecht Durer in my previous post Research Point: Different Artists’ Depictions of Landscapes and then resorted to the squiggles for the trees in the background to give the effect that they are in the distance. Their is a small like at the back on the left I found this quite difficult to draw you can tell there is something there but you can’t quite make out what it is.
I originally had the idea to to use traditional Buddhist items for this part of the assignment such as yellow cloth, a candlestick, temple type money box and did go out and purchase them. The medium I chose for the original composition was coloured pencil, but as I laid down watching the girlfriend iron in front of the electric fan with the white wall of my apartment I had a better idea.
Assignment 1 – Made Objects – finished A2
I wanted to show something about my life in Thailand and I felt that the new objects set out in the right composition would describe my life perfectly, a normal working-class life in a tropical country. With 13 years in the country and the last few years living alone I knew these objects intimately but the fan would prove to be something of a challenge..
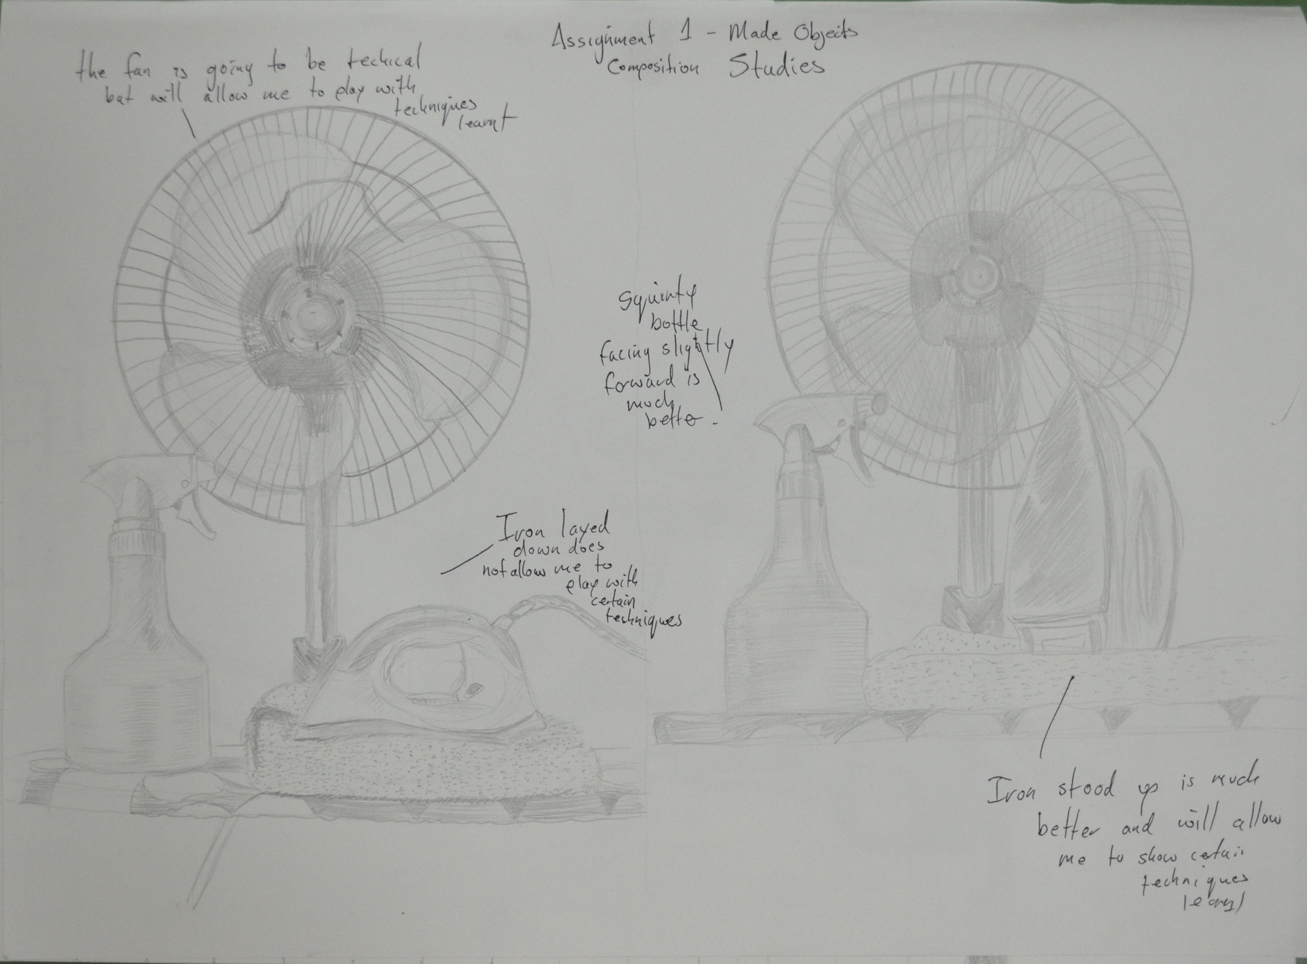
Assignment 1 – Made Objects – composition studies
I began with composition studies in my A3 sketchbook, I found it difficult to come up with more than two variations as I was locked into how i felt the objects should be presented from the start. How every I did vary the composition slightly with the iron laying down in the first composition which I think was actually my first idea and then the iron stood up proudly in the second. The ironing board was lifted up on the table and I was almost laid down drawing the second composition sketch which I liked so much that I decided this would be the one to develop and decided that I would be there for a while so raised the ironing board higher with the ironing board on top of a table on top of another table. We had to do without a place to eat for the next few days.
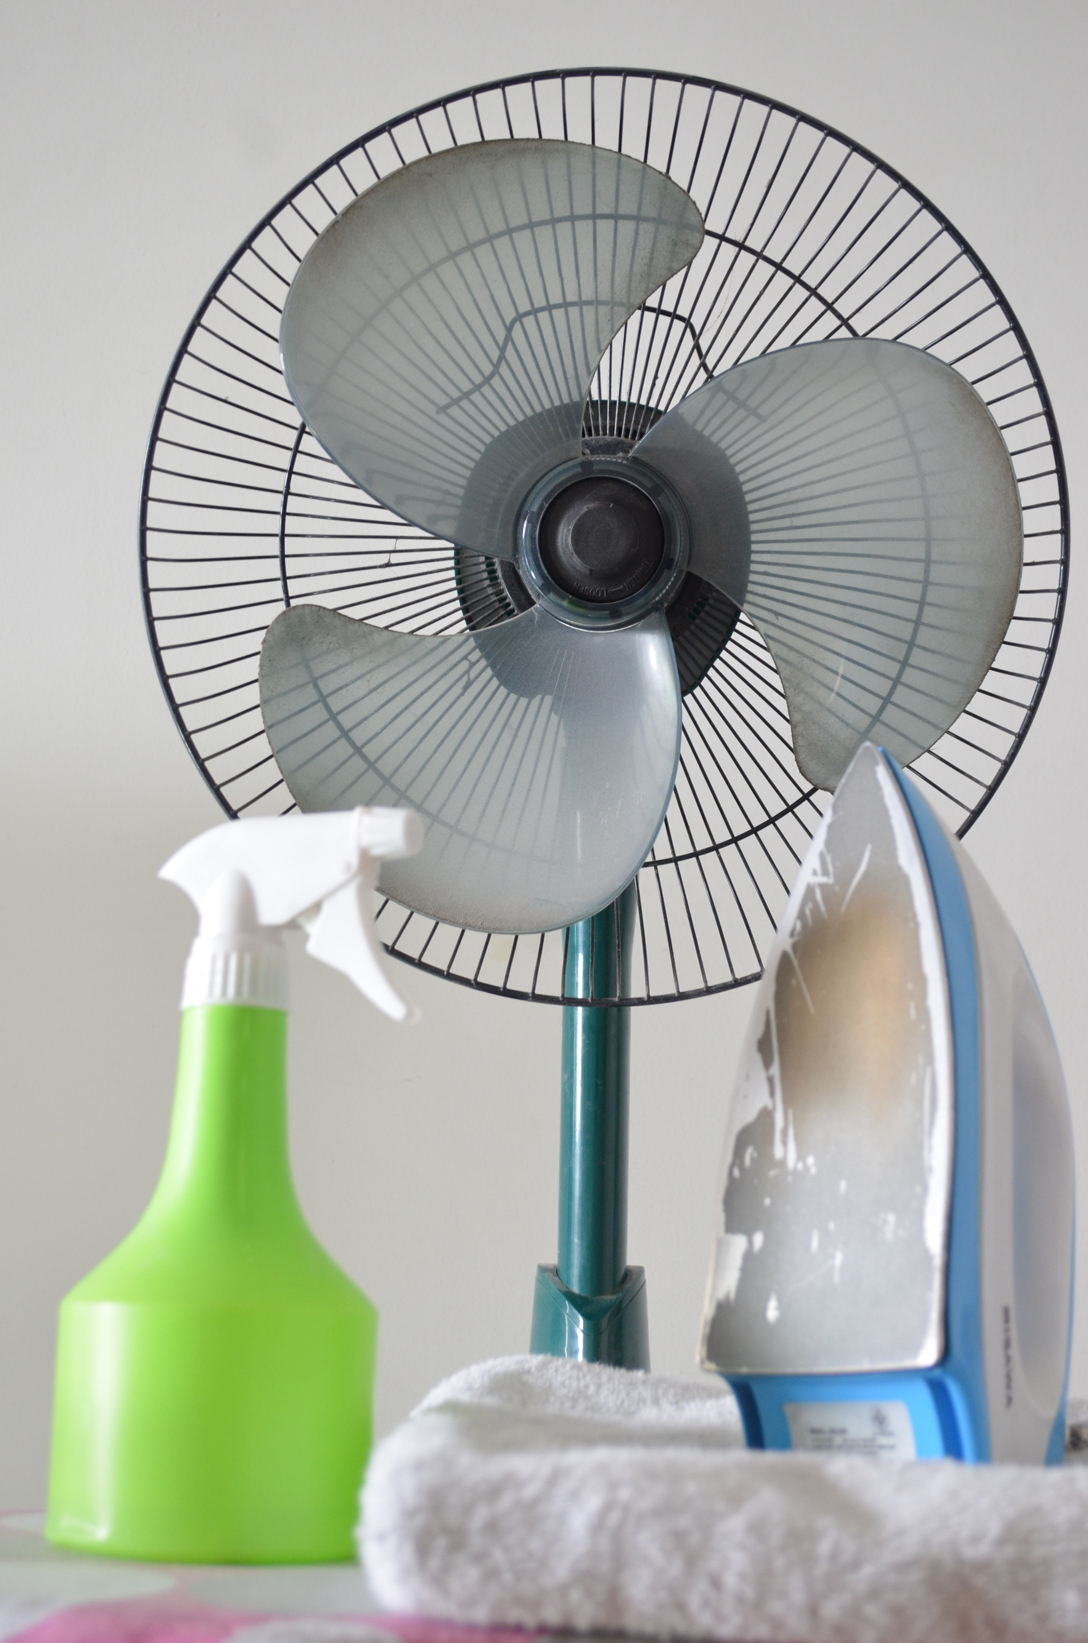
Assignment 1 – Made Objects – Photo of Original Composition
At this stage I did things a little bit in reverse with the composition studies just finished I decided to develop the composition in pencil to get a feel of how it would look in that medium before looking at others. One of the main reasons for doing so was being insecure about whether or not I would be able to demonstrate the techniques especially pencil holding techniques that I had practiced in the first part of this course. I then concentrated on enlarging the image by drawing a grid over the top of the composition ready for enlarging for the finished drawing.
Assignment 1 – Composition Development and Enlargement grid
At this stage I was still not so sure about what medium I would use for the finished drawing, so as instructed on an A2 sheet I practiced with colour pencils and charcoal.
Assignment 1 – Charcoal and Colour Pencil Studies
Charcoal would have been great for the towel and even the water bottle and possibly the iron but on an A2 sheet which I was planning to use this medium proved itself too messy for the electric fan. I did love the way the water bottle looked in charcoal though, rather like stencil street art. Colour pencil wasn’t too bad but didn’t look solid enough for me, I was still trying to get practice with this medium and didn’t feel like I could carry it off in any other medium than graphite pencil and so that was my final decision.
Fan Almost Complete
At this stage i decided the composition still needed more work and moved the squirty bottle further in to create less negative space to fill the rectangle shape of the paper. The layout of the fan was very technical it helped that there was no front on it but still took well over an hour and a compass and ruler for the cage. After everything was sketched out my insecurity about not being able to show the various techniques that I practiced in the first part of the course disappeared as I got into it, swapping between 3B and 4B pencils using different pencil holding techniques and several different forms of hatching.
The squirty bottle was pretty straight forward and quite easy to show tone and form on…eventually after I managed to get the shoulders of the bottle right after several goes, as I had moved the bottle in since the composition development work. This was completed mainly by hatching and cross hatching.
The iron allowed me to use several different drawing techniques including hatching, smudging and drawing the patterns on the blade with a putty rubber. However the shape of the iron varies slightly from the photo above I was having double vision when it came to the iron as my left eye is quite bad but refused to work from the photo.
The towel and the ironing board itself allowed me to draw with texture using short, lines dots and a putty rubber on the towel to dry and fluff it up and cross hatching for cloth ironing board cover.
I’m satisfied that I have managed to make reference to most of the aspects of drawing that have been covered in the first part of the course in this part of my assignment from holding pens and pencils to enlarging an image. Drawing the fan allowed me to demonstrate different pencil holding techniques, the bottle allowed me to demonstrate tone and form while the iron allowed me to show both tonal variation as well as reflected light on the blade. The towel was also a great idea which I originally added to raise the iron and didn’t realise it would help me to demonstrate techniques for drawing with texture.