A Sketchbook of Townscape Drawings

10 cm Squares Tonal and Detail Drawings with 3B and Colour Pencils

With the threat of protests shutting the roads down around my school I had to move quickly with this exercise. I decided to use the square sketchbook that I had purchased from the school suppliers especially for the last exercise ‘Study of a Townscape Using Line‘ which I completed in drawing pen.

The sketchbook wouldn’t have been my first choice for pencil sketches as the paper is very smooth with no tooth at all but as part of the learning process I decided to go with it to see what results I would get putting drawing pencil to paper.

For this exercise the brief told us to, ‘carefully select a viewpoint that gives you somewhere to sit comfortably while you are sketching and making notes. Focus on one particular building, for example a corner site or a building facade, and notice how the other buildings support your main focus.

It was 9 a.m. and one of the coolest mornings we had experienced in Bangkok for a long time, probably the first  morning of the cold season and at 18 degrees it was really quite cold for Bangkok. There were activities in the morning so I took my camera with me to school so I could take some photos of the buildings around the school at what is the best time of the day. From 9-11 the buildings and roads around the school are saturated with the shadows of the trees around the temple. On this fresh morning the area reminded me of a road close to my house in Wakefield, which made me quite home sick as I’ve only been back once in 14 years..

After taking some photos that I could use for reference later I took a chair out to settle down and make some sketches. My first sketch was of my school itself, which is a temple school and therefore built in the same style as a temple and with its external roof beams it looks similar to a building from the middle ages, when viewed at certain angles

1 - Sketch of School in H pencil w notes
1 – Sketch of School in H pencil w notes

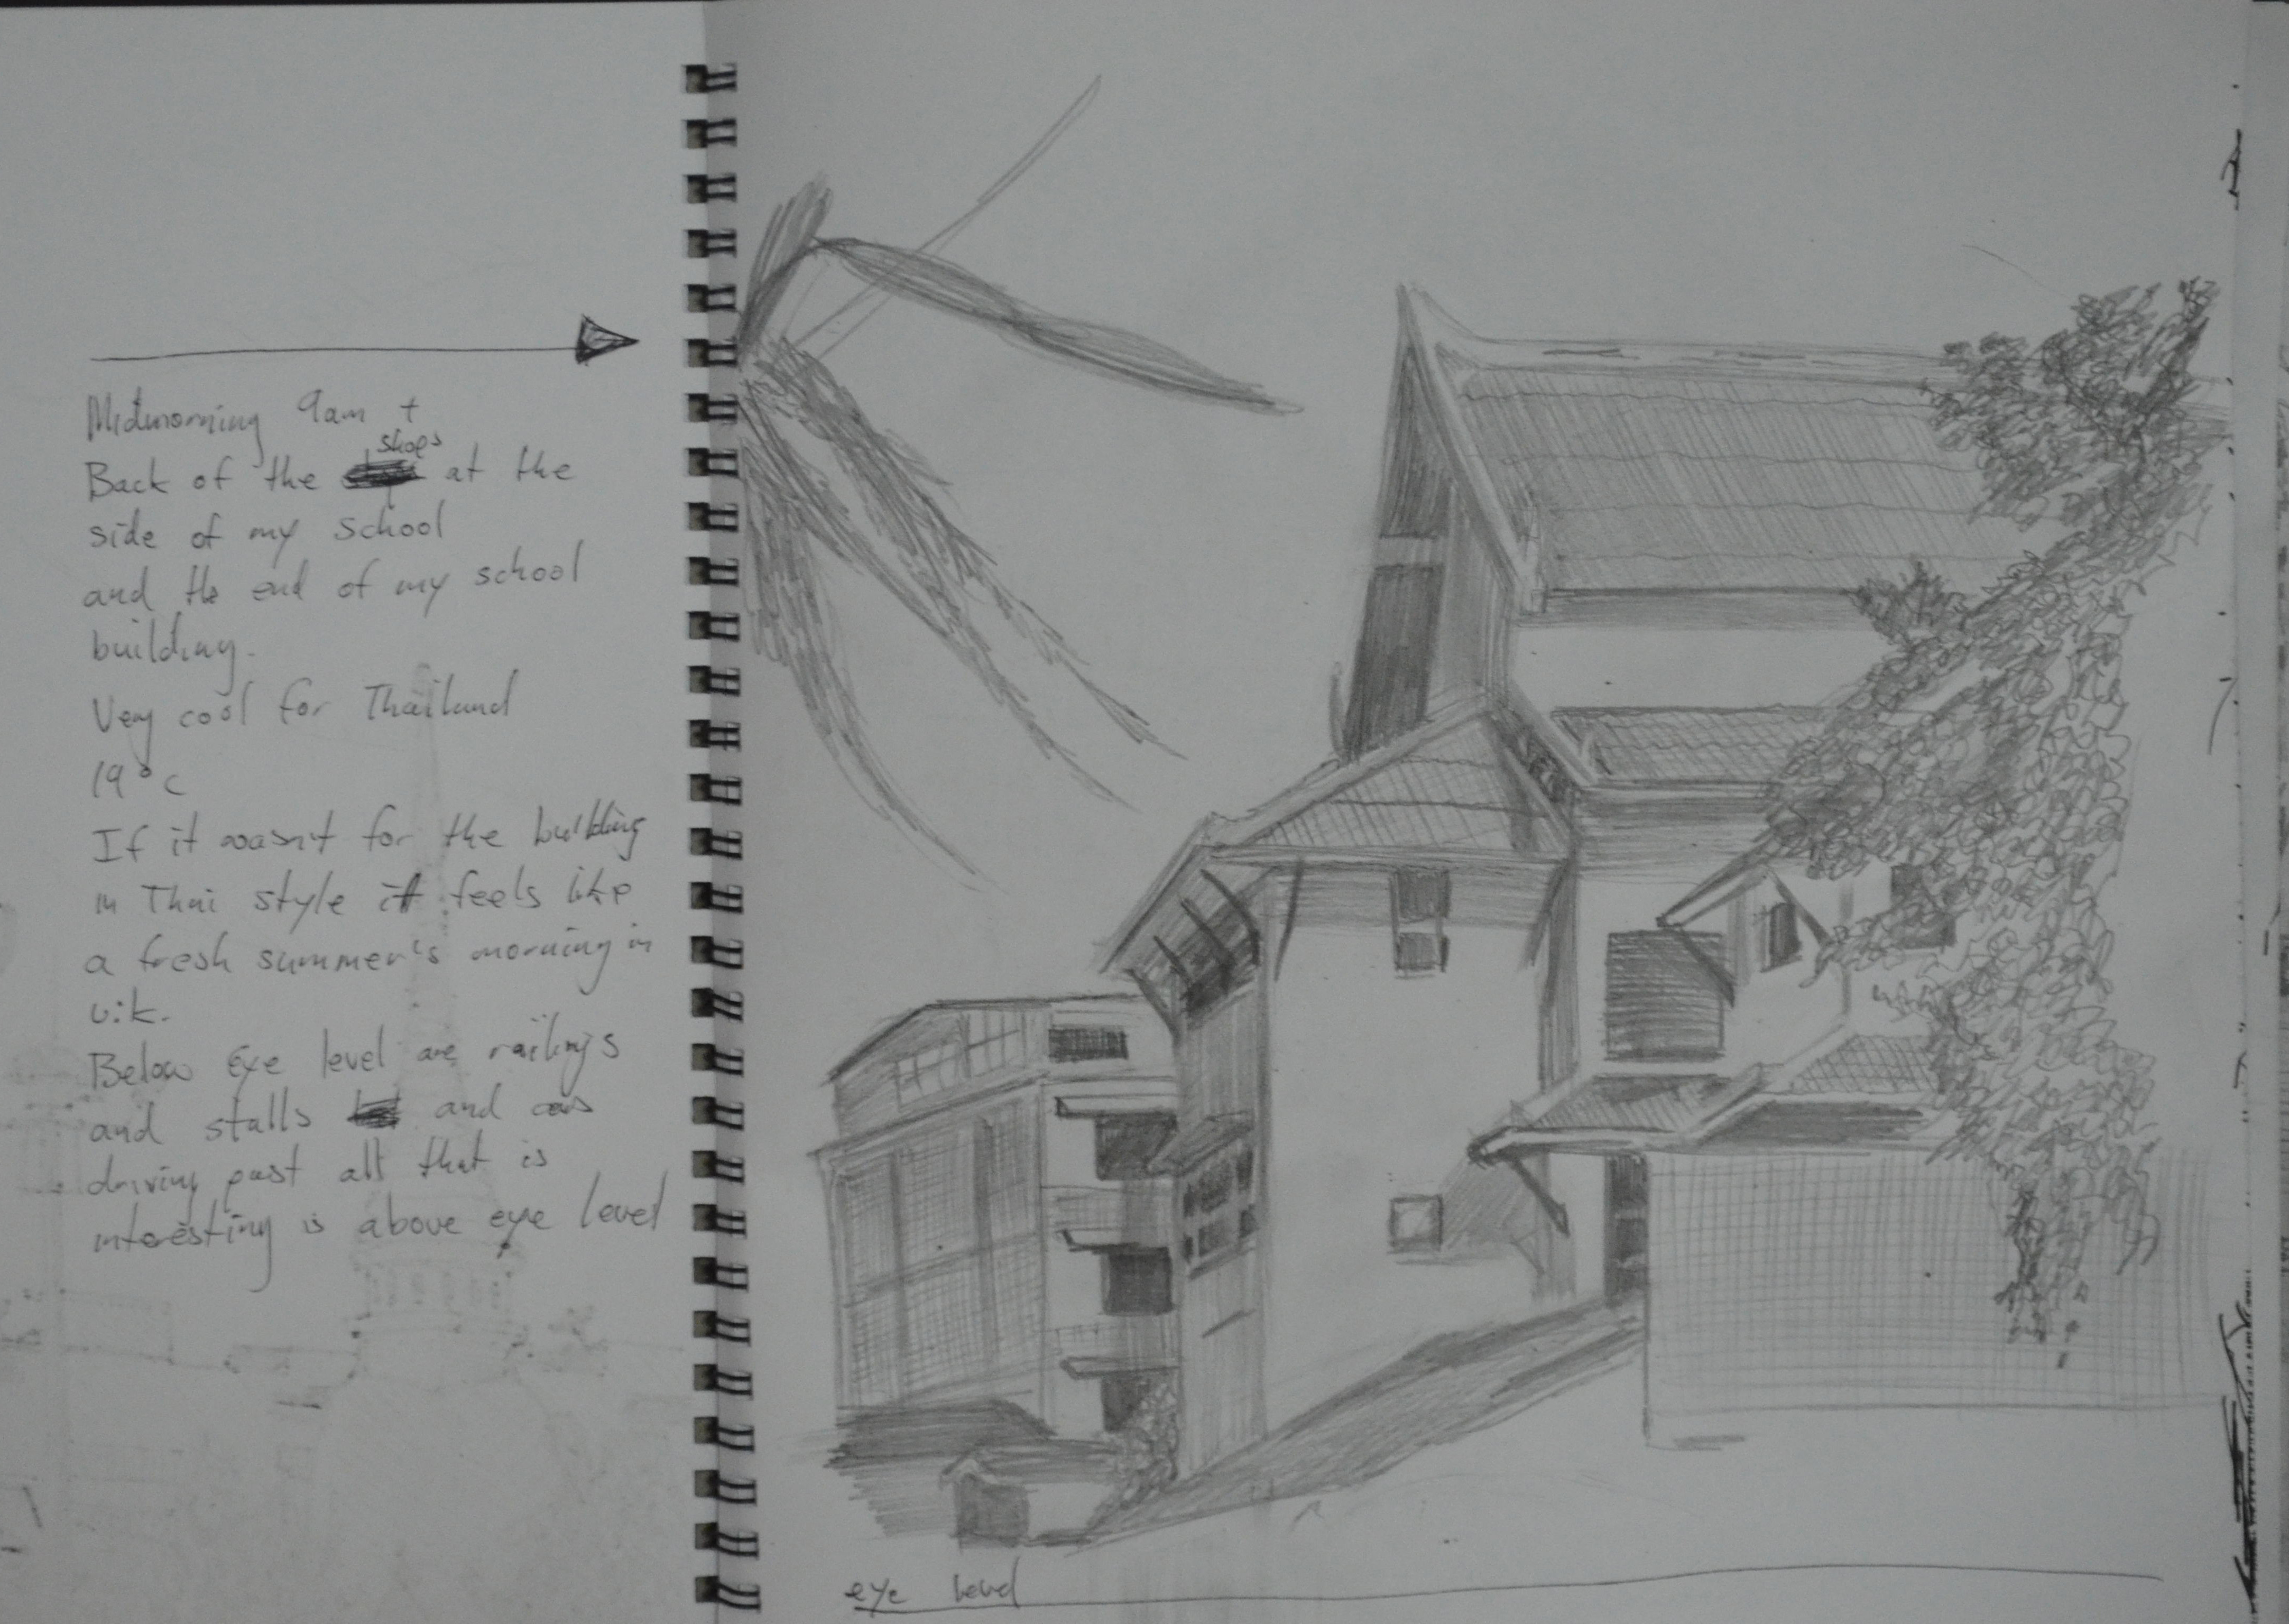
I chose an angle that captured the best part of the school with its tiled roofs sloping in different directions, framed by trees at either side and an old apartment block to the back. I didn’t take the drawing all the way to the road as at this stage I thought I woulds be spending more time drawing around the corner.

Sketch of Temple Gates in H Pencil w Notes

There are plenty of opportunities to make sketches that capture the contrast between old and new within a stone throw of the school grounds. My next sketch was of the temple wall, including two of the temple’s gates and part of the Prathom (secondary) school opposite the primary school where I work.

Sketch of Ginnel in H Pencil w Notes

From there I made a sketch of the ginnel at the side of the school with the shop on the corner. I left out a lot of detail in this drawing while still trying to include the most important parts, which was a real lesson that helped with the next few sketches.

By now I was beginning to find my feet around the area and I had worked my way round to the back of a group of shops that really caught my attention when taking the photos unfortunately I didn’t have enough time to continue outside so the next few sketches were done at home.

Back of the Shops in H Pencil w Notes

It’s amazing how far I am into this course and yet I’m still having problems fitting the subject on the canvas but then again drawing the buildings here that have been built then added onto year after year, are made up of lots of irregular shapes and are definitely not that easy to draw.

10 cm Squares Tonal and Detail Drawings with 3B and Colour Pencils

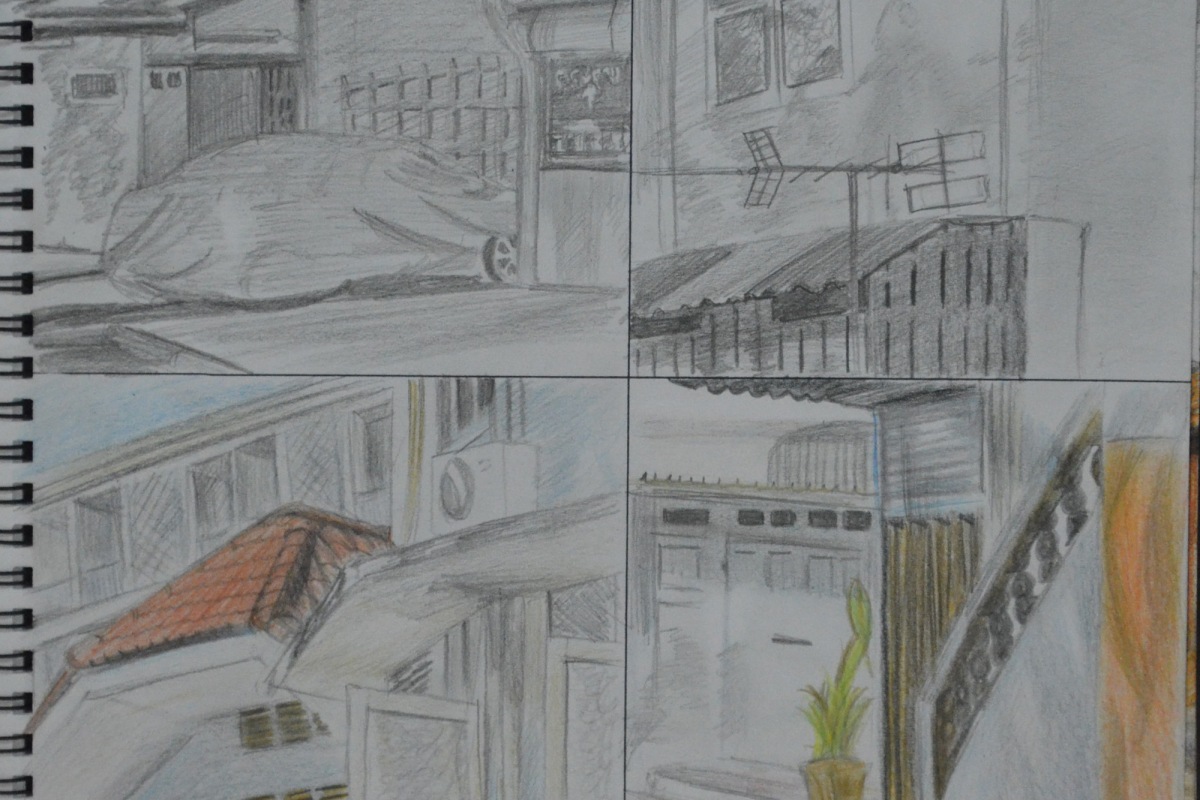
The brief for this exercise also instructed me to make a 10 cm drawing of a detailed part of the building and then another 10 cm tonal drawing depicting how the light falls across the building. I found it difficult to draw detail without drawing the shadows on the building and so I did two 3B pencil drawings and 2 coloured pencil drawings showing both. The drawings turned out rather like a comic strip.

Back of the Shops in 3B Pencil and Dry Watercolour Pencils

I have never liked the waxy feel of the Derwent colour pencils and so the next sketch was done 3B and dry water colour pencils. I really thought that this would be the sketch that I would use for the next exercise but when I finished it I wasn’t that satisfied that I could do that good a job with a limited palette and so did another drawing of the school this time in 3B and colour pencil.

Section of School in 3B and Dry Watercolour Pencils

I loved working on this which was a lot easier to draw than the very awkward shapes in the last drawing, which is why the final sketch looks a lot stronger and so i thought it was an ideal piece to reproduce in a limited palette for the next exercise.

Parallel Perspective – An Interior View

Parallel Perspective - An Interior View

I’m not sure whether I did the second part of this exercise correctly but with the very positive results of the second part of this exercise I chose not to change it and to leave it how it was.

Firstly the brief of this exercise was to draw an interior view through a door a doorway inside a building I chose to draw to draw the view in my apartment from the bedroom into the living room. I placed a rug in front of the doorway as instructed but thinking about it now I think I got the ‘wrong front’ with the rug in front of the doorway facing the other way.

I drew in line as well as tone, the main reason for this being that I found it quite difficult drawing straight lines without a ruler and using tone helped me to get the space right between the lines. I didn’t do much erasing and correcting lines as I was quite happy with the first attempt apart from the rug which seemed a bit wide. I realised afterwards that the reason why the rug seemed wide is because I made the door-frame wider than what it actually is and the negative space took the rug wider. This also meant that everything on the right and left of the door-frame was further apart but I didn’t think erasing and restarting was that much of an emergency so carried on.

Parallel Perspective - An Interior View
Parallel Perspective – An Interior View

I live in a small 1 bedroom apartment in Bangkok with all the doors in irregular positions so the only real view I could draw was from the Bedroom into the Living room with the patio door into the kitchen on the right hand side, I didn’t think it would give me as many lines as it did but with the air-conditioning the open door and the patio door it gave me a great perspective.

Parallel Perspective an Interior View with Superimposed lines

When it came to the second part of this exercise the brief kind of confused me so the way I did things next probably conflicted with the brief in the coursework. I had a pack of gel-ball point pens in different colours. I used one colour to draw in the eye-level and then different colours for the groups of lines that met at different vanishing points.

I was very surprised by how accurate the angle of my lines were in the drawing I was also very surprised to to see which lines in the drawing met at the various vanishing points across the eye level line.

Drawing Cloud Formations

1 - Cloud Formation in Oil Pastel

For this exercise I had to draw comprehensive tonal studies of cloud formations in charcoal, oil pastel and conte with the aid of a putty rubber.

It’s in the transition from rainy season to dry season here in Thailand but most of the rain happens in the afternoon and as I drew most of the following around mid day most of the clouds seemed to be developing into rain clouds.

I probably went about this exercise the wrong way, instead of drawing sketches in my sketchbook as it seemed a lot of other students have done I used separate sheets of paper and tried filling them up with not just the clouds but the blue skies behind the clouds to try and capture how the rays of light bouncing of the clouds effected the skies around them, and what a task.

1 - Cloud Formation in Oil Pastel
1 – Cloud Formation in Oil Pastel

My first drawing was started in the morning from the car park at the Tesco Lotus shopping mall where I teach. I’m still really new to oil pastel so I started the drawing by drawing in the blue skies giving me the silhouette of the cloud then drawing in the dark parts of the cloud after. I could see it was going to take me a long time but luckily there was no strong winds, which is usually the norm here in Thailand during the rainy season, as the clouds just seem to form slowly through the course of the day, so I took a photo  and finished the drawing at home.

The hardest part was depicting the sun shining behind the top of the clouds, I think I managed to do this by making the shadow of the cloud a lot darker in that area, so the white would look brighter.

I wasn’t going to be able to any more drawings until the next day so that night I decided to do something different. It was about 9 o’clock in the evening and I could see the moon shining through the sun so I took a photo of it from my window, When taking a photo of the night skies the camera seems to capture a lot more than what the eyes can see, I live on the 26th floor and I’ve often noticed that when taking photos of Bangkok at night clouds appear on photos that I didn’t think were there.

2 - Clouds at Night in Hard Pastel on Black Paper
2 – Clouds at Night in Hard Pastel on Black Paper

I originally thought that I could do the drawing just in conte but I only had three colours a dark brick, black and white but then as I started to draw more and more colours began to appear so I highlighted the moon and the clouds in yellow and orange hard pastel, a move that would change the course of the exercise.

A Photo of the Moon at Night

The next drawings was done from my apartment window it was about half past two in the afternoon and the clouds were really starting to form now. One particular cloud caught my eye and because of the lack of wind I managed to get two drawings of it one using hard pastel for the blue skies.

3 - Cloud Formation in Charcoal
3 – Cloud Formation in Charcoal

To be honest I don’t think I captured the full body of the cloud very well in charcoal and it could have looked a lot fluffier than what it did. The next drawing in hard pastel was a lot better.

4 - Cloud Formation in Hard Pastel and Charcoal
4 – Cloud Formation in Hard Pastel and Charcoal

The next three drawings were done in my sketchbook in soft pastel. a medium that I wasn’t instructed to use in the brief but I really wanted to have ago in another medium as I wasn’t very keen on oil-pastel and because of the soft cloud formations and blue skies outside my window I thought it was very suitable, plus I haven’t done much work in soft pastel so far so it gave me a chance to use it.

6 - Sketchbook Drawng in Soft Pastel
6 – Sketchbook Drawng in Soft Pastel
5 - Sketchbook Drawing in Soft Pastel
5 – Sketchbook Drawing in Soft Pastel

The final drawing was done in the early evening and it looks like wain was on the way but it was a really nice evening the problem was lack of selection of colours in the soft pastel set that I bought so this is something I have to correct.

7 - Sketchbook Drawing in Soft Paste (Evening)
7 – Sketchbook Drawing in Soft Paste (Evening)

I haven’t done as many studies I would have liked to in this exercise but with the amount of work I have had on lately I’ve slipped right behind and I want to get moving with the final exercise in this module but I’ll hopefully be doing more cloud studies throughout this part of the course and adding them later.


A Sketchbook Walk

A Sketchboog Walk First Sketch : HB Pencil

The Brief for this exercise was to ‘Go for a walk in your local park, around your garden or somewhere you normally walk. Find a  view that you like or are familiar with and use your viewfinder to help you focus on a point of interest. This could be a trees, a gate or a road.’

I had been working irregular hours over the last month as schools were on holiday and I had been working in the language center and with pretty earlier sunsets in Thailand I spent most of the day time I had left doing cloud drawings for the third exercise in this project. Finally I dropped on lucky with two days off which it turned out I needed for this exercise alone.

The only suitable place for this exercise and probably most of the others in this module is a place called ‘Suan Rot Fai’ (Suan=Park, Rot Fai = Train) which is basically a large park on the outskirts of Bangkok with lots of trees, lakes, grass, sculptures and a rotting train. So I set out armed with my artists wrap, filled with different pencils and charcoal and my viewfinder that I made in the first part of this course to see what I could draw. After a long walk around the park getting familiar with the sites, sculptures, trees and other landmarks, I decided that it was more like Disneyland than a park with scaled down replicas of famous Thai landmarks and a kind of theme park with traffic lights and statues of strange looking Asian Cartoon figures.  Being spoil- for-choice on what to draw I made the decision to get some sketches of more natural looking subjects.

The first subject that caught my eye was some kind of park keepers shed, which was a bad choice for me really because when it comes to drawing any kind of structure like this I like the perspective to be perfect and although I followed the brief and didn’t erase any mistakes I might have made, I drew very slowly and the shed itself took me at least 30 minutes. It was in a great location and the trees above cast some lovely shadows which I think I did well to catch and I think I managed to do a great job depicting the light reflecting off the glass shutters at the side. When it came to drawing the trees I think I also did quite well but I could have chosen a better technique on drawing the leaves on the trees although the focal point of the picture, the shed, takes your mind off the rubbishy bits.

A Sketchbook Walk First Sketch : HB Pencil

Bangkok is very flat and the first time I rode around this park on a mountain bike this year I realised that this was probably the only place in Bangkok that had sloping paths so I took the opportunity to make the second sketch of a path swooping round a bend it was about 4:30 in the afternoon by now and in Thailand time that’s nearly twilight so I had to work a lot faster now and I realised that this was probably going to be my last sketch of the day, not just because I didn’t think I’d  have enough time to do another before it got dark but also because the park was filling up with people jogging and on bikes as the Thais don’t like to get sun tans and so they come out as the sun is going down.

A Sketchbook Walk Second Sketch : HB Pencil

This time I started by drawing the snaking outline of the cycle path and the trees on the left hand side of the road. There was a hell of a lot of trees here for my liking and it was difficult to see where the trees in the background came up to behind the trees in front but to be honest I think I did quite well drawing them and the light that shone down the short grass behind them. I also think I did quite well drawing the trees at the back on the right hand side of the road but totally messed up drawing thee trees closest on the right. However like the first drawing with the road acting as the point of focus it kind of takes your mind off how badly drawn they are.

The light shining on the road through the branches and leaves above was a challenge so I decided to go about this by hatching across the road to show the shadows coming off the trees, smudging the pencil lines with my finger and then erasing the areas of light with a putty rubber then where needed hatching again over the top for more shadow.

Day 2

To do the last two sketches I came out again the next day which was unfortunately a public holiday so I was limited for where I could sketch in peace as the park was full, so much for not wanting to get a sun tan.

My third subject was something that I thought would be a lot easier to draw and found extremely difficult, logs against a tree. I sketched in the tree first to give myself a starting point with the logs and taking advantage of the negative space started work on the chopped down chunks of tree. However the hardest thing was making the logs look like logs as the texture was quite difficult to replicate in a quick sketch the tree behind however was a different kettle-of-fish I spent more time on that and I think I managed to pull off the texture quite well.

A Sketch Book Walk Third Sketch : HB Pencil
A Sketchbook Walk Third Sketch : HB Pencil

Behind the tree was a miniature junction painted on the floor-fail! I did love drawing the shape of the big trees in the background though, I can’t wait to start drawing trees later on in this module, there are some great eucalyptus trees in the park. The grass was also a task as it was very patchy and the grass in Thailand is very different from the grass in the U.K., more like a weed than grass. Overall I am not very happy with this drawing but it was the quickest so far I just have to improve before I start drawing the 360 degree studies in 15 minutes per drawing!

With the park being pretty full I found myself in places where the Thais wouldn’t go or at least wouldn’t be distracting me walking around in the background so I found myself looking at this clearing and with the sun beating down and everything in the foreground looking very dark it was the perfect opportunity to pull out my charcoal pencil. I had been using an HB pencil for the first three pencils and just wanted to use something different so I began with a charcoal pencil to draw in the tree, which when I finished reminded me of a Klimt painting for some reason then I drew in shadows with an EE, taking the shadows up to the road, drawing in the road with HB and then taking the shadows over the road.

A Sketch book Walk Fourth and Final Sketch : Charcoal Pencil, EE and HB
A Sketchbook Walk Fourth and Final Sketch : Charcoal Pencil, EE and HB

Unlike the previous picture the grass here was real grass and perfectly cut so instead of having to draw individual blades i simply shaded then smudged. This time for the branches of the tree itself I left the squiggles alone and used and drew the leaves with marks similar to those used by Albrecht Durer in my previous post Research Point: Different Artists’ Depictions of Landscapes and then resorted to the squiggles for the trees in the background to give the effect that they are in the distance. Their is a small like at the back on the left I found this quite difficult to draw you can tell there is something there but you can’t quite make out what it is.

Research Point: Dog Anatomy and George Stubbs

George Stubbs an engraving from The Anatomy of the Horse

In this research point we were asked firstly to look at the skeletal structure of the cat, dog or horse and then secondly t research the anatomical drawings of George Stubbs.

The Skeletal Structure of a Dog

For the first part of the research point I decided to take a look at the skeletal structure of a dog, I’ve never been that interested in domestic cats, big cats on the other hand are a different story.

Firstly I found a great little video on YouTube showing the skeleton of a dog while trotting, getting familiar with the animal in motion I think is important when depicting movement in drawings.

Dogs have the same skeletal structure all though the length and shape of the bones changes from breed to breed with difference in height, width and length a Dachshund for example would have short leg bones compared to say a Great Dane and an English Mastiff would have a broad rib where as a Greyhound would have a deep rib cage. The biggest noticeable difference being the size and shape of the skull.

Skeletal Structure of the Domestic Dog

The canine skeleton is into two sections which are the Appendicular skeleton which includes the front and back legs and hips and the  Axial skeleton which includes the  includes the head, spine, tail and chest area.

Skeletal Sttructure of a Daschund
Skeletal Sttructure of a Dachschund

When looking at the dogs skeleton for the first time it’s amazing to see how much leg there is above the knee and even in the Dachshund skeleton the legs are suprisingly long.

Great Dane and Chihuahua Skeletons
Skeletal Structure of a Greyhound

The Anatomical Drawings of George Stubbs

Mares and Foals in a River Landscape 1763-68
‘Mares and Foals in a River Landscape’, 1763-68 (oil on canvas)

I can’t lie, I had never heard of George Stubbs before taking this course and to be honest paintings of horses in front of beautiful scenery have never really interested me, for some reason they remind me of sitting in gloomy houses on rainy days. Over my 40 years I have probably seen prints of George Stubbs’s paintings many times in families and friends homes and the surrounding environments have never really made them stand out. Not that I wouldn’t pay them the respect they deserve if I saw the actual paintings in a gallery environment.

Whistlejacket, is a name that I have heard before, but I’m not sure from where, looking at the painting it does look quite familiar and this unlike say ‘Mares and Foals in a River Landscape’, is not only a very likeable painting but the detail he has captured in this work is quite stunning not only has he managed to capture the muscle tone in every part of the horses body but he has depicted perfectly the texture of the horses hair in its body, main and tale. I love the way he has captured the defined muscle in the back legs to depict how the back legs are taking the weight of the rest of the horse as it rears up. It is a very beautiful piece and reminds me of the Study of a Horse by Leonardo da Vinci that I posted in my previous research point.

George Stubbs an engraving from The Anatomy of the Horse

I absolutely love his anatomical drawings they’re quite dark and are more up my street than his finished pieces. Looking at the Dorsal View off the Muscle Structure of a Progressively Dissected Horse, Study No.7 from The Anatomy of the Horse, 1766 you can see how this study of the muscles in the hind legs of the horse has informed him of how the muscles should look in different positions, and how even after the completion of Whistlejacket, a painting that he was commissioned to paint by the 2nd Marquess of Rockingham of her champion racehorse 4 years earlier he was still persistent to take his realistic paintings of horses to the point of perfection.

Stubbs was born in Liverpool in 1724. His father was a currier and as a child he would help his father in his job stretching and burnishing leather for the local tannery. He moved to a remote farmhouse in Lincolnshire in 1756 with his lifelong partner, there he began work on ‘the Anatomy of the Horse’ a book of engravings illustrating the many layers of the horse’s anatomy from its skin to its skeletal structure.

He had a ready supply of cadavers (horse corpses) from a nearby tannery which he strung up from the roof on hooks in different poses as required. He thoroughly recorded his dissections with drawings and notes at every level as he peeled the creatures through their skin, muscle and all the way down to the skeleton. The book took him 18 months to complete and was finally published in 1766.

George Stubbs Skeleton of a Horse

In ‘The Skeleton of a Horse’ 1766 (engraving) he has captured the stance of the horse so well that it seems to be a live like an x-ray or CGI skeleton and you can definitely see how this has helped him capture the spirit of the horses in his finished paintings.

Bibliography:

http://www.artyfactory.com/art_appreciation/animals_in_art/george_stubbs.htm

http://www.wikipedia.org/

http://www.youtube.com/watch?v=fyot9IlVw1c

Drawing Animals: Fish On a Plate

Completed Exercise - Fish on a Plate

In this exercise I was to buy a fish and put it on a decorative plate, setting the plate in a neutral context. Ideally using water-soluble pencils to draw the fish, paying special attention to the , way the light catches the fish’s eye, mouth, gills, body and tail.

Well my first obstacle was to buy a fish as we have a totally different variety of fish here in Thailand than the UK so I chose a fish called a Pla Tha Pien which maybe a Java Barb or Gold Foil Barb. It wasn’t a very attractive fish but it did a really good job of catching light.

Completed Exercise - Fish on a Plate
Completed Exercise – Fish on a Plate

I didn’t have a really nice plate either in fact I am a bit of a minimalist and only had one plate until last week so I used the same plate as I had used in other exercises.

Photo of Subject - Barb on a Plate
Photo of Subject – Barb on a Plate

The next obstacle was the paper, I couldn’t find any Bockingford paper and the closest I could find to it was a Canson Cotton paper that was over 50 pounds for a pad and on my budget that just wasn’t happening, so I bought a cheaper Canson paper that stated ‘Wet and Wet Technique’ and ‘re-workable’ on the front, at only 420 Baht or 8 pounds for 20 I thought that was reasonable, slightly smaller than A3, A3 being the size of the really expensive next step up.

I wasn’t very clear on the ‘water-soluble pencils’ it said in the brief for the exercise, I have a small pack of Derwent water-soluble sketching pencils, water-soluble colour pencils by Masterart and a pack of Watercolour pencils by Faber-Castell, so I used the latter.

I tried wetting the paper first and it warped like hell and after an attempt at drawing on it I decided that it would be best to draw, go over it with the brush and then draw again while the paper was still wet, this technique worked.

With a limited pallet of colours but not too limited and the way I positioned the bendy light over both fish and plate it was easy to see what colours I should use on the different parts of the fish, the only problem I could see was how I would go about drawing the texture of the scales on the fish’s body.

Fish on a Plate - head

The head was easy enough and didn’t take long to complete, I used 5 colours in total on the head drawing dry then going over with a wet brush to blend and then re-working where necessary and I am pretty pleased with the results on the head which I think looks very like my subject.

Fish on a Plate - body
Fish on a Plate – body

From there I worked on the underneath of the gills and the belly and then up through the fins to its top side. On the side of the fish I used very similar colours as I did for the head but a very different drawing technique, I found that hatching in a light blue, light green and light pink over the top of each other created an almost scaly texture which I then went over with a wet brush and then filled in some of the diamonds with a dark grey.

Fish on a Plate - detail
Fish on a Plate – detail

The most difficult bit of the fish was the top and the front of the dorsal fin as when water touches black it becomes a bit too dark especially for a drawing like this. I have looked at several tutorials which say if you have to use black use a dark blue , which would not be suitable for this fish. In the end I did use black but over the top of an already damp paper and then went over it with a cotton bud to catch some of the colour.

Fish on a Plate - fish complete
Fish on a Plate – fish complete

The finished drawing is not brilliant but for the time I spent on it I’m quite happy with the results. The only part of this picture I am not happy with is that I rushed the completion of the violet coloured cloth that I used for a background.

Drawing with Other Coloured Media

Drawing with Crayons and Oil Pastels

In this exercise I used the same subjects as the Drawing Plants and Flowers in Coloured Pencil exercise and drew them in a variety of other coloured media, using Watercolour pencil, marker pens (fine and chisel nibs) and coloured pencil, watercolour pens, crayons and oil pastels.

Due to the choice of mediums and that I would be using them together I used watercolour paper for both of the drawings that I did in this exercise, knowing that the watercolour pencils and markers would react better with watercolour colour paper and hoping that the crayons and oil pastels would cling better to the rough texture of the papers surface.

Drawing with Crayons and Oil Pastels

I started the first drawing with the intention to use a lot more coloured media on this but it turned out to be a personal experiment to see the difference between oil pastels and wax crayons. With the wax crayons, I didn’t have much of a range of colours as I was using some I had bought from my kids a few months back but luckily enough there was enough colours for the subjects in my arrangement so I went through the arrangement flower by flower, leaf by leaf weighing up the advantages of each of the mediums. On the watercolour paper I found that the oil pastels clung to the paper a lot better than the wax crayons which left alot more white space than the pastels. I also found that the colours of the  oil pastels were a lot more vivid. Layering over the top of the wax crayons with oil pastels was a lot easier than the other way round. It was also easier to get a better stroke with the oil pastels than with crayons as the tip of the crayons rounded off to easy. Nonetheless, both mediums, in my opinion, are better for the parts of the subject with less details such as the flowers rather than leaves; this would change with the size of the sheet of paper used.

Drawing with Markers, Water Coloured Pencils, Crayons and Water Coloured Pens

For my second drawing I used a wider variety of coloured media inluding marker pens (chisel and fine tips), coloured pencil, watercolour pencils as well as watercolour pens and wax crayons. Starting with the orchid flower like I did in the previous two pictures I worked my way around the arrangement. For the orchid I used markers mainly chisel tip and with no red available for the last layer I used coloured pencil which really worked well on top of the markers. I drew the other orchid flowers above in wax crayon an they looked somewhat drab against the bright colours of the markers.

The mixed mediums that impresssed me the most were the fine markers over the top of watercolour pencil for the red roses, the outcome of mixing these two mediums was a lot more impressive than coloured pencils in the last exercise.

The watercolour pens (watercolour felt-tip pens) which are actually quite bright when used by themselves were very dull over the top of damp watercolour pencil, however they did blend quite well, somewhat uncontrollable but I feel with a bigger sheet of paper and more practise they could be used quite well together or just the pens by themselves.

Watercolour pencils were suited to drawing the flowers but not so suited for the detail in the different leaves in the composition they were also a good base for using other mediums over the top.

I don’t really like wax crayons maybe because of the feel on the paper or that they seem to need a lot of hard work to get your drawing looking anything like you want it too but then this could be down to the type of paper used.

All in all I thought this exercise was a lot more time consuming than drawing in coloured pencil but that boiled down more to the thought process than anything else. I am not too happy with the results but it was great getting to know what the different mediums could do together.


Plants and Flowers in Coloured Pencils

Plants and Flowers in Coloured Pencil

For this exercise I bought an assortment of flowers from the Tops supermarket while I was visiting my kids for a meal for my oldest daughters Birthday. The flowers I chose were orchids and some red and pink roses, I really was not thinking about shapes or colour when I purchased them but I am glad I made the choices that I did. On an A2 sheet of white paper I began to draw.

Roses and Orchids
Roses and Orchids

Now the brief said to experiment with different methods of blending in my sketchbook first, however I thought I had had enough practise blending colour with colour pencils so far in this course so I put pencil straight to paper, for the flowers this was no problem but for the leaves I wish I had done as the brief said and practised a little more.

Drawing the Orchid
Drawing the Orchid

I began with a neutral colour for each subject starting with the orchid and working my way around the composition working on the most prominent flowers and leaves first keeping a careful eye on negative space.

Part way through the drawing I read the brief again to find out I had skipped over some valuable instructions:

  • Make the plant the focal point of your drawing but draw the background
  • Do not draw the plant in isolation
  • Draw in the context to give depth and substance to the drawing

The background I had chosen was a plane white wall with brown skirting boards and very pale floor tiles but I decided to carry on and I am glad I did. Using three different types of flowers with large leaves and petals on the orchid the composition and the vase I had placed them in made up the main subject and the background. Placing the largest flowers at the front and the smallest at the back helped me to create a nice three dimensional effect with the large orchid flower taking on the role as the focal point of the drawing.

I used different methods of blending for each of the flowers with layering used on all, the Still Life Group in Tone Exercise early on in this part of the course really helped using 3-4 colours on each flower but starting off with the lightest colour first and working my way to the darkest.

I used long strokes for the orchid to give it a stretching outwards feel and to me it almost seems like it as a life of its own.

Drawing in the Red Roses

For the red roses I coloured them in a spiral motion then layered the darkest colours over the top rubbing out the colour from time to time to let the lighter colours show through.

Flowers Complete
Flowers Complete

The pink roses were the most challenging of the lot with the colours and details being so delicate I decided to tackle them in a different way by hatching then squiggling over the top for the flowers where you can see the petals grouped together.

Aspects of the Drawing I am Satisfied with:

I am really happy with the 3 dimensional feel of the drawing and the way the different solutions I came up with to tackle each type of flower pad off. I am also very happy with way the drawing came together using the practise I had from the Negative Space in a Plant Exercise helped me to piece the drawing together like a jigsaw.

Plants and Flowers in Coloured Pencil

Aspects of the Drawing I am not happy with:

As always I wish I had read the brief again and again until I was clear on what I had to do but then this would have lead to a one or two plant composition  which would have probably been a lot less challenging.

I wish I had practised blending colours in my sketch book if just for the leaves and stems, although not all the leaves and stems are clearly visible I can see that I definitely could have improved on the blending on those parts of the flowers.

The final drawing is very sketchy although this is a big difference from some of the final drawings in part 1 of this and I know I allowed the the sketchy artist I researched earlier to influence me in this exercise I would have preferred a more realistic finished  drawing.

Still Life Group in Tone

Still life group in tone

After the last exercise ‘Still Life Group Using Line‘ this exercise sounded like it was going to be a breath of fresh air and indeed it was…

Still Life Group in Tone

I started with a bit of a study to firstly get the right composition for this exercise and then to try out different colours so I could find three colours that would give me three different tones for this drawing. I feel like I cheated on this exercise as I chose objects that could be drawn easily enough with just three colours, a yellowy green banana, an apple and two green bananas but I just started a high fruit diet the week before and I used objects that were at hand.

Like it instructed me in the brief I screwed up my eyes to take a look at the dark colours only and lightly sketched them in and then chose a different colour to sketch in the mid tones, then another for the light tone. On completion of the initial sketch I decided that my darkest colour was too light and so changed it for my final drawing.

Still life group in tone

I changed the composition of my final drawing slightly so I could depict the full form of the apple and I’m glad I did. The final drawing took me less than two hours going at a really steady pace and I am really satisfied with the completed drawing and my choice of colours, It would have been nice to apply a fourth colour though and also maybe a variation in orange and reds.

The one thing I am not happy with is the amount of blank space I left on the paper but I tried to make up for this by shading with my darkest colour.

Still Life Group Using Line

Still Life Group Using Line 2

In the brief for this exercise I was to set up a still life group out of objects at my disposal, either objects that naturally connect together or deliberately contrast. For this I did a supermarket shop and purchased onions, a big chunk of knobbly Asian pumpkin and a red cabbage thinking about three objects that gradually went from rough to smooth.

I had to think about the following questions: ‘How will I treat the objects?’, ‘How will their connections be clear?’, ‘How will I capture the differences between the objects?’, ‘How do the objects relate to their background? and ‘How will I reference the colour in the group in this drawing?.

Then with these questions in mind I had to select a medium such as pen and ink, marker pens or fine black pen and A3 paper and begin to draw; which is exactly what I did. I wanted to use pen and ink for this drawing as I have kept delaying it but when i saw I would be using them in the next project I decided to use a Rotring 0.3 drawing pen.

My objects had already been in the fridge a couple of days so they wouldn’t last long once I took them out and my SD card for my camera kept locking due to me removing it too often so I had to work fast as I couldn’t get a photo to work from in case I didn’t finish before evening came.

 Still Life Group Using Line 1st Drawing
Still Life Group Using Line 1st Drawing

There was no drawing this out in pencil first for me, I wanted to do start as I meant to go on and and put my Rotring drawing pen to paper. I started on the outline of the three objects together rather than drawing them individually then when the outline was complete I finished the shape of each object individually.

From there I started on the lines of the onion which were fairly simple and while I worked my way around the onion with a variation of light and dark lines (applying different pressures) I thought about how I was going to approach the different objects. Working from right to left I tackled the red cabbage next and it was extremely difficult; trying to view the patterns as a whole and then working on the lines individually was enough to drive me crazy.

The pumpkin was the next obstacle and because this was a still life group using line I had to exaggerate the texture of the pumpkin at certain parts where there was no real pattern at all. It looks like I have tried my hardest to depict tone here but actually I wasn’t thinking about tone at all. I was just trying to complete the surface of the pumpkin with as many different line as possible, squiggly lines, short strokes, anything that came to mind.

The cabbage leaf on the right of the drawing was probably the most difficult object in this drawing and was very difficult to draw without hatching to depict it’s smoothness which I wasn’t very successful in doing so.

Then when I finished the composition I ruined the whole picture by doing some stupid speckle background and so I decided to have another go.

Still Life Group Using Line 2

This time I tried a slightly different angle and the finished drawing was cleaner but there are a lot more things that I am unhappy with. For one I don’t know how the cutting board got so out of shape the cabbage leaf didn’t turn out that great and the pumpkin surface was a little too exaggerated but certain parts of the pumpkin surface turned out a lot better.